VOYAGE
Walkthrough
...at margotbean.com
Created by: Kheops Studio
Published by: The Adventure CompanyTM
Alternate Titles: Jules Verne's Voyage, Journey to the Moon, Journey to the Center of the Moon
Official Site: http://www.journey-to-the-moon.com
If you've read my review, you know that I found this gem in a bargain-bin for $6. But, it didn't come with a manual. If you're in the same boat, I'll give you the basics.
Inventory Menu
Once you're in the game, right-click to bring up the inventory menu, from which you can access the main menu (the Esc key doesn't work). The inventory menu has an "Auto" button on the right, which will quickly place your accumulated items into inventory slots. On the left, there are five buttons:
- Main Menu
- Your personal Log
- Puttering About - this gives a visual list of the object combinations you've made
- A list of the lunar Ideograms you've deciphered
- Your progress in the initial Investigation into where you are and what's happened to you
General Notes
You can't die in the game, but it can freeze - especially when loading cutscenes...so save often. You can also take the CD out of the tray and put it away, because you don't need it once you install the game.
It was difficult to write this walkthrough, because the game is so non-linear. I've tried to use descriptive section headings so you can find the section where you're currently having trouble. Good luck!
Initial Investigation
After the opening cutscene you land in some sort of metal room. Take note of the rich red velvet upholstery and drool. Right-click to bring up inventory, and take the time to familiarize yourself with all its features. There's a lot going on there.
Close inventory by right-clicking, then click forward once. Automatically see Part I of the Investigation solution. (If you like, open inventory and click on the "Investigation" button to see it again.)
Click on Barbicane. Pan up and right and click on the newspaper article on the wall. See Part II of the Investigation. Pan down and right and click on the other man to see Part III of the Investigation. (Marvel at his horribly-rendered hair!)
Pan up and left of the newspaper article, and click on the strap holding the wrench to the wall. The "short strap" goes in inventory, and the wrench falls to the floor. Pick it up. Open inventory, and click on the "Auto" button. Re-sort the items in a more logical manner, if you like.
Close inventory, turn around, pan down, and use the wrench on the bolts holding the window plate to the window. (To "use" the wrench, right-click to open inventory, left-click on the wrench, right-click to close inventory, then left-click on the bolts.) See Parts IV and V of the Investigation.
Note: If you have a problem with the game freezing up when trying to load a cutscene here, then start a new game and click on the newspaper article after clicking on the bolts.
Click forward once, toward Barbicane. Wonder at the strangely and suddenly calm tone of Michel's voice as he declares "I've got to understand just what happened." Pick up the key that's fallen from Barbicane's pocket to the floor. Click on the letter in Barbicane's hand. See Part VI of the Investigation. Click on his breast pocket and read the letter from Diana Moon. See Part VII of the Investigation. Click on Barbicane's hat as well. Resist the urge to put the hat back on his head. Click on the hat in inventory - the lining is "strangely misshapen." Use the knife on the hat. Read another letter from Diana. See more of the Investigation. (If you've already played past this point, and never took the hat, it's perfectly all right, you'll gather the info. in another way.)
Oxygen Issues
At some point you will have received notice that you are suffocating. You need to open the cabinet over Barbicane's body with the little key that fell out of his pocket. For now, take the green journal on the left (a monograph of lunar ideograms - what a horrible time to give us something to read!), and the bag of chlorate of potash behind it.
Go towards the other end of the capsule, to the sink and the contraption with the flame under it. Click on the contraption over the flame once to pull it towards you. Now you can either let yourself die first (which I highly recommend, as it will put a cutscene in your Picture Gallery) or skip that and put chlorate of potash in the tray, then click the tray to put it back over the flame.
If you want to see the windows fog up, then click on the wheel below the flame once to turn it up. You become giddy from too much oxygen. You have to wait a bit for the windows to fog, but you can't die from this experiment. If you want to see frost form on the windows, turn the flame down to low and wait.
If you like, pan down from the potash-burner and click on the metal can with the funnel, click on the funnel, and click on the metal can to the left of can with the funnel. If not, you can collect the can and funnel later.
Go back and take everything you can out of the cabinet, including three cans of food and three bunches of raffia. (Three is the magic number for inventory - you can carry up to three of each item you find.) Be sure you click on the bottle with the red "CN" on the front, and on both wine glasses to see more of the investigation.
Turn and click on Nicholl. See Parts XIII and XV of the Investigation. Take the rifle. Click on Nicholl's breast pocket and read another love letter from Diana Moon. Click on Nicholl's mouth...more "bitter almond" odor.
Save Game here, there's a cutscene coming up. Enjoy Michel's antics on the savegame screen. (Remember glass monitors?)
Turn around and notice a rooster on the floor. Go over to him and hover the mouse over him. See a cutscene. Pick up the burnt piece of paper from under the seat and see Part XIV of the Investigation. (If you turn the flame up or down after discovering the rooster, he will either "be suffocating" or "awfully gay." Go ahead and laugh out loud at Michel's quaint nature.)
Turn to the gas burner and turn it down to the lowest flame. Click the burnt paper on the flame. Solve the investigation.
Note: If the flame's too high, you will destroy the paper. Then, you will definitely have to find and unplug the Belbaab conch to solve the Investigation.
Weightlessness
Sometime soon you will experience weightlessness. If you haven't collected the metal can and funnel, do so while they're floating around. You need to combine the can and funnel in inventory, then use it to collect the bubbles. The bubble-meter on the right will gauge your progress and tell you if you have bubbles left, because some of those bubbles are awfully hard to see. (If you like, collect a bubble with your bare hand to hear Michel say they burn. You can also collect a bubble with the can and no funnel to hear Michel say it's not very efficient. The can and funnel are only a bit better, as you don't have to click - just pass the tip of the cursor over the bubble.)
Dispose of the Bodies
When you've collected all the bubbles, there's another cutscene. Now is a good time to dispose of your friends. Click on the blanket below each of their bodies. Use raffia from the cupboard on the blankets. Click on the bundled bodies to take them into inventory (very weird!) If you select them in inventory, it says that you can put them back on their benches if you want to. If you do, tie them back up, because we've got to get rid of them before we land.
Be sure to take the can opener from Nicholl's bench. Open three cans of food, and go grab three more cans from the cupboard. (Click an opened can of food on Michel in inventory, and he says it would be better cooked. You may be able to put it in the frying pan and cook it on the gas burner. "Quite tasty.")
Open the floor window and throw Barbicane's and Nicholl's bodies out - right-click to open inventory, left-click to select one of them, right-click to close inventory, left-click on the hatch latch (on the right), then left-click on the opening. Repeat for the other one.
Moon Landing
Very soon you will notice the temperature has dropped. There may be frost on the windows. Go over and turn up the flame to high.
Eventually you will see a cutscene that begins your descent to the lunar surface. You need to ignite your retrorockets in order to land. The red one is loaded, but the blue is spent. You can either...
- Smash the barrel from the cupboard with the wrench, or
- Break open the rifle cartridges with the knife.
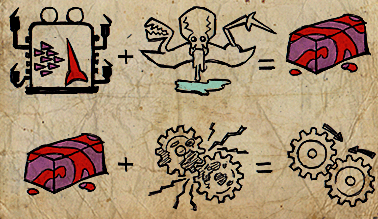
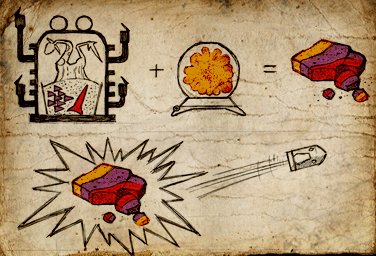
I recommend breaking open the rifle cartridges, because you can sell the barrel later for more money than the cartridges. If you've clicked the cartridges on the rifle in inventory, you know that the rifle is unusable as a weapon anyway. Either way, you get explosive powder. In inventory, combine it with the blue retrorocket.
Go to the hatch in the floor, and click on the metal circles inside the blue and red circles. The retrorocket hole covers slide open. Put the blue one in the red hole and the red one in the blue hole. (Just kidding.)
Save your game.
Push the silver button below the flashing green light. Allow yourself to crash-land at high speed so you can see that cutscene. Afterwards, you will automatically be put back to the point before you hit the silver button.
Now we have to lighten the capsule's load. Turn left, and go to the window. Click the wrench on the bolts at one corner of the window. The protective cover falls away. Do the same to the other two windows, the one at the right of the capsule, and the one in the ceiling.
Go back to the hatch in the floor. If you hit the silver button again, you will discover that the capsule's still too heavy, and you need to throw more items out. Or, you can take my word for it.
|
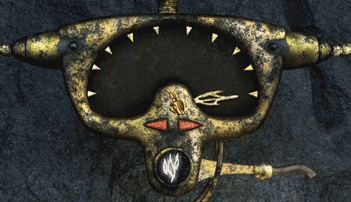
Before you hit the silver button again, throw the wrench, the rifle, and the bolts (actually, these are nuts) out the floor hatch. Then hit the silver button. When the speedometer needle is on the black line between orange and yellow (or in the yellow), you're light enough to land. (If you're up for experimentation, you can throw out everything else (including Barbicane's hat and the burnt paper if you still have them)).
When you're light enough, you have a while to wait to land. (That altimeter arrow moves so sloooowly now.) Eventually you land on the brink of a precipice just before lunar dawn. Enjoy all the cutscenes.
|
 |
The Moon
When you have control again, the capsule is on its side. The oxygenating system is twisted, but not ruined. Open the cabinet (to your right) and have a glass of wine. You will experience the "drunken effect" - there are several different ones. My favorite is the one where you hiccup every 10 seconds or so. Click the wine glass on the dripping sink to fill it with water, then click the glass on Michel Ardan in inventory to sober him up. Grab another glass of wine to take with you.
Click on the rooster. He doesn't seem very happy to have been kidnapped and taken so far from home.
Load up on raffia and exit the cabin through the floor-hatch. (If you wait too long, Michel will say that he has to open it to get some oxygen, and it will open automatically.)
"Hooray, the moon is mine!"
When you have control again, click on the sculpted stone wedged against your capsule. "It'd take a lever to remove it." Click on the red plant.
Turn left from the red plant and click ONCE on the green fruit. (Clicking a second time will cost you the joy of Michel's comments.) Once Michel's done talking, take two more fruit. If you like, you can click one on Michel in inventory to hear his comments. Take another then, and turn left.
Click forward once and learn that you weigh six times less than on earth. Turn around and take the yellow fruit. Don't bother eating it; Michel says the exact same thing as when you eat the green fruit. Then turn back and pan right or left until you see the green "leap meter." The game tells you that you have to leap when the pointer is in the green. Take your first leap. If you like, leap long or short on purpose to see the cutscene. Enjoy the crazy sound effects upon successfully completing your first leap.
The Crater
From your landing spot, turn and look down at the plants. Click down once, then click on each plant. Hostile! I recommend going around the crater and doing this for all colors of plants. The purple stinger-plant is especially enjoyable. Luckily, it has terrible aim.
Leap back to the capsule to see the green plant has grown up and commandeered your vessel. Click on it a couple of times. Click on the capsule door a couple of times.
Jump back to the crater, then jump to the middle of it. Pick up the bent aluminum plate.
If you're tempted to make all possible leaps now, go for it. But, some of the more difficult ones will be easier later...
From the center of the crater, click towards one of the small pools of water. Both have some kind of control panel, but we only know three ideograms so far.
Next to each pool is a large curved metal structure. Check them both out. The one by the red plants is broken. Pick up the lunar coin from the ground. You now have 2...cents? The structure by the yellow plants is working. Click on the slot above the glowing lunar symbols on its base. You now have only 1¢, but you've gained knowledge of your next destination. When you exit the closeup, Michel discovers the meaning of the unknown ideogram on the telescope - coin or money. It is placed in your "ideograms" journal.
Before you leave, spin around and grab three blue lunar reeds.
Go towards the spikes sticking up from the crater between the pools of water. Spin around and go down the steps. Pick up two more yellow fruits.
Pan up and click on the top of the large semicircular structure. "It's stuck! It needs some grease or oil."
Turn around and go to the right once. Pan down and right. "Shells!" Click on the dirtpile ONCE and wait for Michel to comment before picking up two more bunches of soil-in-a-shell. Pan right and pick up three pieces of blue lunar raffia. Pick up the dead branch from the ground to the right of the raffia pile.
Go back up to the very top of the crater. Leap to the structure between the blue and yellow plants. Jump once more, to the orange arches in the rocks. (Yes, this one is a real pain.)
As you land, Michel deciphers the ideogram for water. (If not, then move the mouse slightly down and hover over the ideogram with the wavy lines.) Hover over the ideogram on the metal tank to the left and Michel deciphers the ideogram for fire.
Pan left and pick up the lunar coins to the left of the small pool of fire. Click on the small patch of dirt to the left of the fire pool. Michel wants to "try some planting."
"Do Some Planting"
Whenever you have the potted plant from the capsule in inventory, you can "do some planting." If you threw the plant out the window of the capsule to lighten your load, then you will do this part later.
You need a blue fruit. You can grab one floating up past the alcove with the small dirt patch and water/fire tanks, or you can ascend the broken staircase and find a patch of them on the ground. To ascend the staircase, face the water tank, then turn right. Look up. Leap. Turn around 180°, look up, and leap again. Pan down and pick up three blue fruits. Turn around and leap back down to the alcove.
In inventory, combine blue fruit + soil-in-a-shell from the organ area. Create a blue seedling. Combine blue seedling + potted earth plant + raffia (either earth raffia from the capsule or blue lunar raffia from the organ area). Create a plant hybrid. You need to click this hybrid on the small patch of soil in the alcove. A lunar/earth plant hybrid grapevine grows. You can climb up and down it, saving yourself the trouble of leaping around on the broken staircase. Pick three bunches of grapes from the grapevine.
While we're in the alcove with ready access to cooking fire, combine yellow + green fruit + frying pan, then click the "pot of mixed fruit" on the fire. (Perhaps the game designers initially intended the frying pan to be a pot, but changed their minds.) Make green/yellow compote. In inventory, click the compote on Michel. He "feels splendid!" Note the icon (in inventory) below Michel that looks a bit like a tadpole. Hover over it and see that your jumping will now be easier. It's the perfect time to try those extra-difficult leaps, if you like.
Back at the alcove, combine yellow + blue fruit + frying pan, then click the frypan on the fire. Make a blue/yellow compote. If you like, eat it yourself. "I feel weird!" And how! Make another compote to take with you.
Top of the Mountain
If you've planted the grapevine, click on it to ascend to a landing near the top of the mountain complex. If not, you will have to take the stairs. While standing in the alcove, face the water tank, and turn right. Look up. Leap. Turn around 180°, look up, and leap again. Repeat until you are at the landing with the small altar. (Michel's log describes the structure as an "altar"...I think it looks like something else entirely....)
Colored Gears
Turn to the "altar" and click on the wheel. The colors change. Match the colors on the wheel to the colors of the plants on the crater. Click on the colored gear to take it into inventory. Notice the blue light lit to the lower left of the wheel. There's another light to the right, unlit. Try to repeat the color combination, and Michel will comment that there's another solution. (This game is all about the color combinations!) Since I don't think it makes any particular logical sense, I'll spare you any musings and just give you the solution: reverse the direction of the colors. In other words, start at any point with purple, then red to the left (counter-clockwise), then blue, then yellow, then green. Take the second wheel. Make four more colored wheels and take them now.
Turn around and go up the steps. "Damn", he spit at us. Pan down and click on the viscous secretion. "Yikes!" If you like, repeatedly click on the creature to be thrown down to the altar area. Go back up and feed him a green fruit. He doesn't like that. Try a blue and yellow fruit. He likes them, but not enough to calm down. Give him the blue/yellow compote. He loves it. He'll be busy eating like that for a while.
Click on the viscous secretion three times to take it into inventory. Pan left and look at the glowing pictures on the rock. That thing on the ground looks like something we ought to be able to take into inventory, but it isn't. Perhaps it's just something to draw our eye to the pictures....
Pan right and go forward towards the closed door. Turn left and place a colored gear (either kind) on the panel. Turn the handle on the panel. The door opens, and the gear disappears. Go in. Listen to Michel's thoughts about the pictures on the wall.
Enter the Necropolis
|
If you're not currently seeing green from consuming yellow/blue compote, go back down to the alcove with the cooking fire and make a yellow + blue compote, then click it on Michel in inventory. Go back up past the creature, through the doorway, then turn right and look at the wall. "What do you know?"
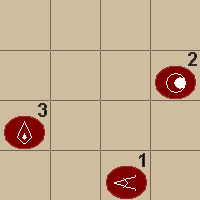
Turn left and go forward to the gate. Look down and see the ideograms from the wall are on the ground inside the gate (they are awfully hard to see, though). Turn left and click on the panel for a closeup. Enter the symbols from the wall (and floor) in order:
|
 |
The gate opens. Go on in. Now you can clearly see the ideograms.... Listen to Michel's thoughts on finding a necropolis dedicated to earth-worship.
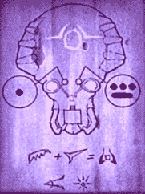
Go forward (as far as you can) and turn left. Click on the sarcophagus. Click the can opener on the sarcophagus. "Damn," the can opener breaks. Take the iron bar, selenite key, lunar tool, and leakproof globe. Click on the inscription at the bottom of the sarcophagus. Open your "Log" from inventory and look at the inscriptions. You seem to have a recipe for glue, and the basics of a number system. A dot represents 1 and a bar represents 5.
Turn left and go forward. Turn left. Use the iron bar on the sarcophagus. Take the damaged mechanical arm, damaged flute, and gold necklace.
Exit the Necropolis - First Time
|
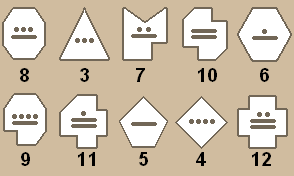
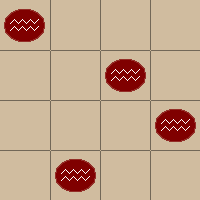
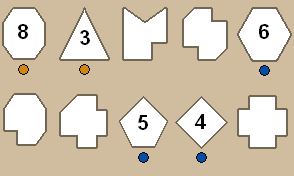
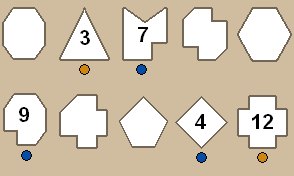
Time to leave. Turn around and click on the panel to the right of the gates. See ten shapes, that have sides numbering from 3 to 12. Also see a blue light-bar below the shapes - it's one of four such bars, similar to the colored wheel altar.
Ask yourself what kind of process has four different modes and involves numbers...come up with arithmetic (adding, subtracting, multiplying, and dividing). Adding is easiest, hence it's first.
Add up the number of sides of the shapes with green lights lit, and press the shape that has that many sides. For example, if your triangle and hexagon are lit, then the sum is 3 + 6, or 9. Find the shape with 9 sides, and press it. EZ, right? Do this four times correctly, and the gate opens.
|
 |
Note: Mistakes won't cost you any IQ points, don't worry.
Hint: If you consume red/blue compote, the Selenite numbers will show up on the shapes.
Exit the necropolis and turn right. Go to the door. Place a colored wheel in the panel on the left, then turn the handle to open the door. Go down the steps.
Turn left, and explore if you like. You can't get the machine in the observation room working yet, though.
Back to the stairs, facing the open shaft with the death symbol, click on the death symbol to enter the elevator shaft. Enjoy the cutscene. Recover, and press the button on the right to call the elevator.
Once inside, check out the map in front of you. There's a passage between the crater and this mountain complex. Wonderful!
Turn right and use the Selenite key in the slot with the square symbol. (This is the same symbol you have in inventory, on the big red "empty" button.) Press the button with the "to see/to know" symbol on it - the lowest one that's lit up.
Office of Selenite Dignitary
You descend to the office of some Selenite dignitary. Enjoy the conversation. They really have a poor opinion of us earthlings. When you regain control, I suggest you exhaust all dialogs, though none are necessary for game completion. Later on when you have some money, you can pay the dignitary for information...but not yet.
Click on the seashell-contraption to your right. Exhaust all dialogs that you can. Turn right and click on the metal button in the middle of the machine there. So, that's how you can make money. Excellent!
Turn around 180° and click on the button in the middle of the machine. Spoken language test...I hope you are not hearing-impaired. (If you are, you can still complete the game, though you will be unable to gain maximum points.)
Ideogram Test
Turn right and click the button just above the floor in front of the Selenite dignitary. It's an ideogram test. Save your game then try it. If you make a mistake, reload your saved game and start over, or you won't gain maximum lunar IQ points. If you want to cheat, click here for the list of ideograms and their meanings. (You can also wait until you've discovered the meanings of more ideograms on your own, since ideograms that are already in Michel's log won't be on the test.)
Spoken Language Test
Turn left and click on the spoken language test machine. This one's not too fun the first time, but it can be done. Unfortunately, it's random, so I can't give you the answers. Here are my best tips:
- Save your game before you start.
- Calm down and focus. If you want to run around and explore more, then go do that instead and come back here later.
- You need to hit a button on the left, then its match on the right. You can hit several buttons on the right before attempting a match, and you can also hit several buttons on the left before attempting a match. Play around with the sounds on the right until you find one you think you can identify. Then hit buttons on the left until you think you have it. Hit the button on the left, then its match on the right.
- The sound for "Coin/Money" is particularly sharp, and may be the easiest to start with.
- The sound for "Moon/Supreme Lunar Ruler" at the top right is also a bit cacophonous; it may be a good second choice.
- Three buttons, played together, form a melody that I find somewhat easy to identify:
- Water
- Air/Breathing
- Life/Relief/Friendship
These are in the top row, the first three buttons. Play them in order (water, air, life) a few times on the right, then move to the left and find them there. Play them in order a few times on the left until you're fairly sure you have it.
- Save four notes for last: Fire, To Go/Come/Enter, Gloom/Secret, and Light/Truth/Lumen. The first two are ridiculously similar, as are the last two. I find I have to play them over and over before I can hear any difference.
- Turn the sound on your pc up! I can usually identify some sounds by the way they make my left or right eardrum vibrate.
If you're hearing impaired, you've got to brute-force this test...meaning hit the top-left button on the left panel, then hit every key on the right till you find a match. Then repeat for the next key on the left, and so on, until you're done. You'll miss out on earning the IQ points, but you will be able to proceed in the game. (There's a bug in v.1.04 that will allow you to make up the points in another way, though.)
You can earn up to 40 lunar IQ points for this test. The first time through, you can make unlimited mistakes. If you make more than 30, though, you'll forever forfeit 10 of those points. You can take the test any number of times.
You earn 10 points for 16 to 30 mistakes, 10 points for 2 to 15 mistakes, and 20 points for zero mistakes. Normally, you have to do one perfect test to get those last 20 points, but if you make only one mistake on your first try, you'll get all 40 points right away. Similarly, if you make only 2 - 15 mistakes on your first try, you'll get 20 points right away.
When you're done with the spoken language test, head to the elevator, and go up one floor (hit the button with the "Food" symbol on it). When you arrive, take your key and exit the elevator. Turn right and click forward once.
Kitchen
Turn left and hover over the ideograms at the top of the vat. Michel interprets them as "Food Conquers Hunger." They go in your ideograms journal. If you haven't taken the ideogram test yet, there will be two fewer symbols on it now.
Pan down and hover over the vat. Michel says "I must be in a kitchen."
Turn left and pick up the cogged cylinder in the wall alcove to the right of the pile of red fruit.
Turn left and load up on fruit of every color. Take the shovel at the left of the yellow fruit bin.
Turn to the fire and make a green + yellow compote, then click it on Michel in inventory. Reload your yellow and green fruit inventory.
There's a Selenite at the other end of the hall, past the elevator, but you can't converse with him yet. So, it's time to leave this floor.
Collect Exploding Mushroom
Go to the elevator and go up one floor (hit the second button from the top). Take your key, and exit the elevator.
Turn left, and see the exploding mushrooms. Go forward, turn right, and click on one to take it into inventory. (This is muuuuuch easier after consuming yellow/green compote.) Quickly open inventory and click the leakproof globe on the mushroom (or vice-versa). It explodes in the globe, and Michel says "I'll be able to recover the spores."
Open the Launch Chamber
|
Turn left, and look down. Note the symbol for "6" on the floor. Zoom in on the panel in the wall. Note the addition problems scratched in the lower left of the panel. They show 6 + 34 = 40, 6 + 44 = 50, and 6 + 28 = 34.
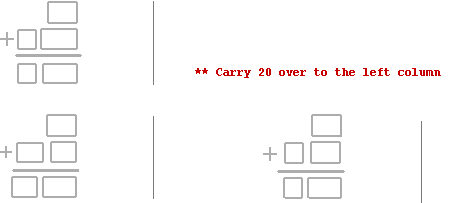
To open this panel, you need to add 6 to the number given on the upper part of the panel, then enter the sum on the lower portion of the panel. When you have it right, click the "To go / come / enter" button:

|
 |
In the Selenite numbering system, the first decimal place (rightmost column) represents ones, just like our system - except it goes up to 19 instead of 9. The second decimal place (leftmost column) represents 20's instead of 10's. So, when you hit 20 in the first column (instead of 10), you carry 20 (instead of 10) over to the second column.
When the panel cover opens, click to turn the lever and open the door to the launch chamber. Go in and turn left. Pull the lever on the floor on the left, then the one on the right. Go in the chamber and turn right. Listen to Michel's comments. Turn around and click on the table - "This is where I have to put the explosives." Pan up and click on the black circle (keyslot) - "This locks the ignition device."
That's it for now; leave the launch chamber.
Access the Crater Forest
Get back in the elevator and go up to the top level. Exit, then leave the mountain complex, and go back to the center of the crater. (To save time later, you can stop at the alcove and make a green/purple compote to take with you.)
Go down to the patch of shells and soil near the organ. In inventory, combine all colors of fruit (except lunar grapes) with soil-in-a-shell to get five seedlings. Repeat. Combine green seedling + yellow seedling + raffia (lunar or earth variety) to get a hybrid seedling. Then combine green seedling + blue seedling + raffia and listen to Michel's comments. Now, combine every remaining color of seedling with every other + raffia. When done, you will have five successfully hybridized seedlings. (You ought not to have to go and reload your fruit inventory, but if you do, you have my sympathy!)
Go up to the stone spike between the purple and green forest plants. Turn toward the plants, then go down/forward once. Click the red/blue hybrid from your inventory on each plant to scare them. Go forward once and witness the lunar creature spitting viscous substance at you. Look down and restock your inventory of green and purple fruit.
If you don't have a green/purple compote with you, you'll have to go back to the alcove and cook one up. Then return and feed it to the creature. When he's subdued, go forward and collect some items thrown from your capsule before landing. (At most, you will find Barbicane's hat, the funnel, the wrench, a protective shield for the capsule window, and a plugged-up conch shell).
Now that you know the procedure, go around the crater and scare all the plants. You have one more lunar creature to subdue, and he likes red/purple compote, since he's in the red/purple forest. Collect all your thrown items, then jump to the alcove to make a blue/red compote.
Get Salt
|
Jump to the middle of the crater, then enter the organ-control room. Consume blue/red compote so you see purple. Look at the panel with the selenite face on it, just to the left of the panel with the arrow-handles you opened earlier. "What do you know?" - the symbols for "1" and "8" have appeared.
Exit the organ-control room and go to one of the water pools on the crater. Redirect the water flow away from the organ (the pool near the lunar reeds needs to flow to the right, and the pool near the broken telescope needs to flow to the left).
|
 |
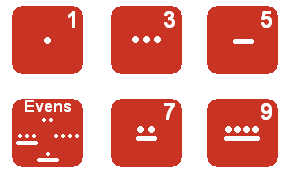
Now turn to the panel with 6 buttons on it. Look at the symbols on the buttons. Across the top there is "1", "3", and "5." At the bottom, the first button is for all even numbers - "2", "4", "6", and "8." The second button is "7" and the last is "9."
 |
At the panel near the broken telescope, press the buttons in order from 1 to 8 (Hit 1, then evens, then 3, then evens, etc.) Watch the pipe-thingy raise each time you hit a correct button.
At the panel near the lunar reeds, you only have to hit the "1" button. When you have the pipe near the broken telescope raised 8 levels, and the other raised 1 level, Michel pauses and says "What do you know."
Return to the organ control room. The panel with the Selenite face has raised to reveal a pile of salt. Take three pinches.
|
Make Some Money
At any point, you can sell items to the Selenite dignitary for cash. Click here for a list of prices. Generally, the buy-back price is 10 more than the selling price. So, if you accidentally sell a needed item, your game isn't hopelessly lost.
You can unload three hybrids, once you've scared all the forest plants. Keep the purple/red and green/purple hybrids for now, though. (If you sell them, you'll have to go through the trouble of making more later.)
Buy the mechanical hand and mechanical elbow for 40 lunars each. You should have enough left to buy information from the Selenite dignitary, if you like.
(Later, you may want to have about 200 lunars to buy info. from another Selenite. Go ahead and sell anything you can replace easily - viscous substance, seedlings, lunar grapes, colored wheels, etc.)
Selenite Key - Level 1
You need a level 1 key to proceed. If you don't have 200 IQ points, then you need to take the ideogram and spoken language tests now! Then hit the button on the left in front of the dignitary to request your key. He begrudgingly gives it to you.
Go up to the kitchen and make a green/yellow compote. Dump it in the food vat, then go back to the elevator. Plug in your new Level 1 key and hit the button with the "Lumen" symbol.
Lumen-Production Room
Exit the elevator and turn right. Go forward and note that the Selenite is too busy to notice you. (That's because you spiked his food with a caffeine-like kick.) Turn right and click on the panel to open it. Take the belt, globe, handle, cogged cylinder, and ax.
Turn around and take the shovel on the ground. Take three bunches of blue ore from the bin. Then click your "empty can" on the yellow liquid to fill it with Azotic Acid. In inventory, combine can-with-Azotic-Acid + plugged-up-Belbaab-conch. You now have the ability to understand all living creatures.
Laboratory
Exit the room and turn right. Look down and note the symbol for "22" on the ground. Click on the panel in the wall for a closeup. Similar to the panel outside the launch chamber, you need to add 22 to the given number, enter the result, then hit the "enter" button. Unlike the panel outside the launch chamber, you'll definitely have to "carry over" twenties this time.
In my game, I believe I always get 18 or 19 as the rightmost digit, so, I always enter either "0" or "1" in the rightmost column (22 + 18 = 40, 22 + 19 = 41). Then, I just need to carry over 40 to the left column (add 4 to whatever's there).
Don't be afraid to bust out a pencil and paper. When you have it right, the insect spy congratulates you.
Click on the lever to open the door to the laboratory. Turn left, and go in. Turn right, look down, and place a shovel on the center hotspot. Pan up and place the empty globe to the left of the existing globe. Pan down and right, and place the strap (either the one you just picked up in the lumen-production room, or the short + longs straps from the capsule) between the wheels. The purifier will be functional now.
In inventory, click the lunar tool (from the Selenite's sarcophagus) on the damaged mechanical arm (from the human's sarcophagus) to disassemble it. Combine the mechanical forearm and mechanical upper arm, then add the mechanical hand and elbow you bought from the distributor in the Selenite dignitary's office. Create a working mechanical arm.
This might be a good time to save your game.
Look at the inscriptions to the right and left of the purifier. They go into your log.
Make Grease
|
Make a purple/red compote on the fire in this room (convenient!), then click it on the shovel at the bottom center of the purifier. Immediately open inventory and select the working mechanical arm, then close inventory. Whenever a pressure valve turns red, click the cursor on it. If you're too slow, you'll have to reload your savegame or try again.
When the purifier stops, click on the shovel to take purple/red goo ("Zubroo concentrate"). In inventory, combine it with viscous substance to get Zubdssik's greasy amalgam. Click the grease on one of the pressure valves, and you'll never have to use the mechanical arm again.
|
 |
Make (and Use) Glue
 |
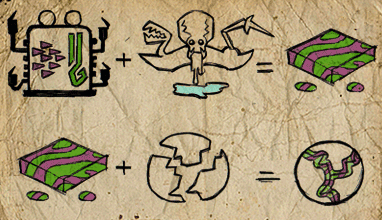
Put green/purple compote in the purifier to get Yrsagtt concentrate. Combine with viscous substance to get Yrshnouff's gluance.
In inventory, combine the broken flute from the human's sarcophagus with glue. Add blue lunar reeds (that you picked up next to the water pool on the crater) and you can speak Selenite!
Glue your can opener back together as well.
|
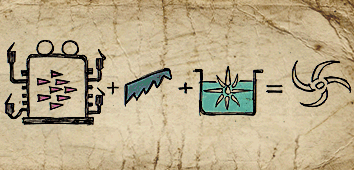
Make Prulmis's explosive mixture
 |
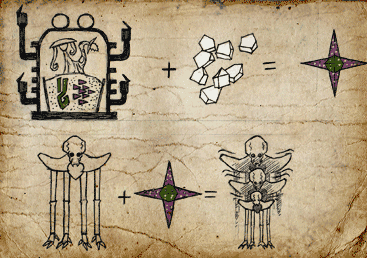
Put a purple/red hybrid seedling into the purifier to get Prultuuk's crystalline powder. Combine with explosive mushroom in globe to get Prulmis's explosive mixture. |
Make Xuldakir's Star
 |
Put a green/purple hybrid seedling into the purifier to get Xulmi's crystalline powder. Combine with salt to get Xuldakir's Star. |
Make oxygen powder - Step 1
 |
Put purple fruit in purifier to get Brozlyss concentrate. Combine with blue fruit. We'll finish the process later, when we have lumen. |
Make Klipso's Lightening Paint - Step 1
 |
Put a purple seedling in the purifier to get Klipsgaal's isotopes. Turn around and click the isotopes on the weighing table for a closeup.
Drag three isotopes to the pad on the left side and three to the pad on the right. Then hit the button in the middle to weigh. Six isotopes are marked with a red "x" to indicate they're not the light isotope. Drag one of the remaining isotopes to the left side and one to the right, then press the button to weigh them. Congratulations, you've identified Klipsgaal's light isotope in only two weighing operations!
(Want a more detailed explanation? Eight isotopes weigh the same as each other, and one weighs less. If you choose six that weigh the same as each other for your first weighing operation, then the light isotope is one of the remaining three. If, however, the result of your first weighing operation is "greater than", then some isotope on the right is underweight. Otherwise, both sides would weigh the same. So, you've narrowed it down to those three on the right. Similarly, if the result of your first weighing operation is "less than", you've narrowed it down to those three on the left.)
Combine the light isotope with blue fruit. We'll finish later, when we have Essence of Klipsaggt.
|
We've done all we can do in the purifier room. Stock up on raffia and soil, then go to the elevator.
Meet Scurvy the Insomniac
Go up to the level with the "food" ideogram. Exit the elevator and turn right. Go to the food vat, then pan to the right of it. Find the hotspot over the lever, and click on it. You've neutralized the "caffeine effect" from the yellow/green compote, and you'll be able to talk to the Selenites now.
Go to the other end of the hall and Save Your Game. Click on the Selenite standing there. Exhaust all dialogs. When Scurvy proposes that you take a logic quiz, respond "Agreed." The answers are: (first set of questions) 1, 1, 2, 2, 1; (second set of questions) 1, 3, 3, 1, 1. Click here for more detail.
If you want maximum IQ points, then don't make any mistakes.
When done, listen to his instructions (if he has any). When you ask for more detail, he responds curtly and doesn't help you. If you like, you can pour some wine from the capsule or a blue/lunar grape compote into the food supply, then come back and query Scurvy. He'll add a bit more info.
Get the Organ Working
Return to the center of the crater. Jump down the steps and click forward towards the doors. Click on them. Turn left and go to the organ. Click on it a couple of times. It "needs both air and water to function." Turn right and go up the stairs.
Pan down and click on the lever on the right. Hear water run, then silence.
Turn around and go forward. Look at the picture with the selenite face on it. Turn right and click on the panel. It has a small door in front with arrow-like handles. Click on the handles in correct sequence to open the panel. The sequence is: Left, left, right, right, left, right, right. The panel opens. Click on the lever to open a hatch. "Aaaah, air."
Go back to the other side of the room and click on the left lever. If you haven't taken the ideogram test yet, you will now understand the air ideogram.
Turn right and go forward, then up the newly opened hatch. Turn right or left and notice the pipes running from the pools of water to the room you just left.
Go to one of the panels in front of the pools of water. The panels are basically sudoku puzzles. You need to click one "water" button in each row and column, in any order, to open the panel. The one near the red plants is easier, because none of its symbols are smeared.
 |  |
| Non-smeared panel near red plants | Smeared panel near yellow plants |
The panels open. Both handles need to direct water towards the center of the crater. The handle next to the broken telescope needs to send water running to the right, and the panel near the lunar reeds needs to send water running to the left.
Return down the opened air-hatch to the organ control room. Make sure the water lever is turned vertically. Return to the organ and press a key to verify that it works.
Gather the Wild Selenites
You need to play specific melodies to call the wild Selenites. You start with the first two keys, then add one each time you repeat the melody. In my mind, the complete melodies go like this:
- Green purple gives life, life gives purple green
- Purple red gives life, life gives red purple
- Blue yellow gives life, life gives yellow blue.

"Gives" is the ideogram for "To go/come/enter", and "life" is the ideogram for "Life/relief/friendship." Note that you can hit the "gives" key at either end of the organ - they're both the same. You can also completely ignore the bottom row of keys.
So start by hitting the green key, then the purple one. Wait for the creature to repeat the melody; he also adds two keys. Repeat his melody (green purple gives life)...wait for him, then play "green purple gives life, life"...then "green purple gives life, life gives" and so on.
When he arrives, pause to hover over him and listen to Michel's comments. Then turn back to the organ and press the purple and red keys. ...When that melody is done, press the blue and yellow keys to start the call to the last creature.
Since the scale over by the entrance is stuck on "3" (the third red circle from the left), you'll have to gather all three Selenites on the scale before the door will open. After they go through the door, Michel pauses and says "The doors have stayed open. Should I take advantage of that to go through them?" (He says this every time, right up to the end of the game.)
Instead of going through the doors, go over to the scale and grease the pointer. Now you can move it to the first red circle on the left - the setting for "1." The doors will open anytime one creature stands on them, including you.
Note: If you're hearing-impaired (or just frustrated with this puzzle), you're probably going to have to wait until you have the level 2 key before attempting to call the wild Selenites. Put the key in the black circular keyhole to the left of the organ, and the correct keys will be highlighted for you. All you'll have to do is start the melody, then follow along.
Meet the Engineer
Use your Level 1 key in the elevator and go back to the lumen-production/laboratory level ("Lumen" button). Exit, turn right, and go forward. Click on the Selenite to have a conversation. When he offers to sell you information, refuse. You can get him drunk (by placing wine from your capsule or blue/lunar grape compote in the food supply) and pay less than he's asking now.
Selenite Key - Level 2
Now that you have 300 IQ points, return, via the elevator, to the Selenite dignitary's office. Request your level 2 key. The Supreme Lunar Ruler grants your request, but demands that you return the items you stole from the necropolis. (Of course, you only have to return the items you stole from the Selenite's sarcophagus....) If you haven't solved the Initial Investigation yet, he will also demand you do that.
Return to Scurvy the Insomniac. Use your new level 2 key in the wall to Scurvy's right. The panel opens, revealing a bust of the Supreme Lunar Ruler.
Click on the bust - it falls and breaks. Scurvy chastises you. Pick up the bust. In inventory, smash it with a heavy tool (iron bar, lunar tool, mechanical arm...) to get salt. Note: if you already have 3 pinches of salt, simply click one on the portrait of Michel in inventory to eat it. Now you will be able to smash the bust.
Combine the bust dust with glue. Michel says "This lunar glue is frightfully effective!" Return the bust to its niche.
Hall of Secret Antiquities
Use your new level 2 key in the elevator, and hit the bottom button (the one with the "gloom/secret" ideogram) to go to the Hall of Secret Antiquities. When you arrive, exit the elevator, then pan right and down. Find the hotspot, then click on the little doorway.
Turn back to the large machine with the star-shaped indentation at the center. Click on Xuldakir's Star in inventory, then click on the indentation. Enjoy the cutscenes.
Note: If you find yourself short on IQ points at the end of the game, you can come back here and put stars in the machine repeatedly to gain 10 points each time. (At least, in Voyage version 1.04, you can...)
Once you are through the doorway, pull the lever to the left of the door to open it. Turn around from the doorway and go forward.
Turn left, and collect the items in the alcoves (mechanical hand and elbow, painting, and broken parabolic mirror). Click on the inscription between the alcoves - it goes in your log.
Turn around 180° and look at the machine. The insect spy tells you it's Klipsaggt's decanter-measure.
There are 5 levers on the machine. The two at the bottom with the "empty/zero" ideogram do just that - empty the tanks. At least, the working one on the right empties the tank. The one in the middle directs flow of pink liquid from one tank to another. The two at the top fill the lower tanks with liquid.
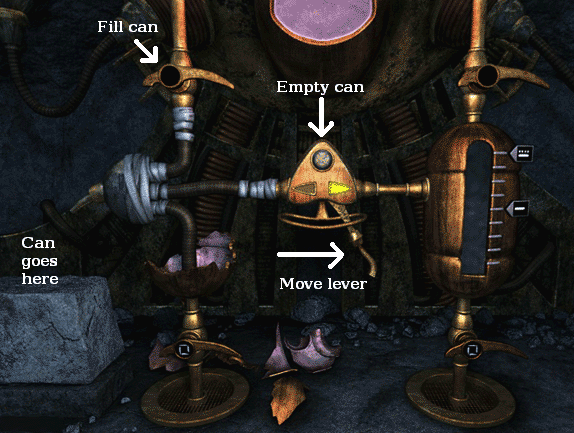
Place your "empty can" on the left side of the machine. Click the lever above your can to fill it with Essence of Klipsaggt. Click on the lever in the center. "It's stuck." Open inventory, click on Zubdssik's greasy amalgam, then click on the lever in the center. Put the grease back in inventory, then click on the lever to move it to the right. Click on the button above the lever to empty the can into the tank on the right. Repeat twice more, and you have a can with three measures of Essence of Klipsaggt. Take the can.

In inventory, combine the can with the blue fruit + Brozlyss concentrate mix you created at the purifier, to get Klipso's Lightening Paint.
Move Your Capsule
Return to your capsule. Now that you can understand all living creatures, click on the green and red plants to see that they are singing "Threatening Songs." Scare the green plant with a red seedling (or the red/purple hybrid, or the blue/red hybrid). Scare the red plant with the blue seedling (or the blue/red hybrid, or the blue/yellow hybrid). Click on them to see that they now sing "Songs of Terror."
You need to paint your capsule with Klipso's Lightening Paint. Check it in inventory. If it's dried up, go inside the capsule and click it on the gas-burner's flame to restore it. Then click it on the outside of your capsule. Enjoy the cutscene.
Click the iron bar from the necropolis (or the rifle) on the sculpted stone that's holding your capsule in place to free it. Enjoy the cutscenes.
You arrive at the launch chamber. Enter the capsule, and turn to the rooster. Since you've unplugged the Belbaab conch, you can understand him when he talks! He's not at all happy to have been kidnapped, and wants to return home.
Solve the Investigation - Alternate Method
Note: If you never used the knife on Barbicane's hat, or if you accidentally destroyed the burnt paper (etc.), and you've unplugged the Belbaab conch, the rooster will fill you in on the missing pieces of the Investigation now. I believe you get full IQ points for solving the Investigation this way.
Make Chlorate of Potash
Exit the capsule, and turn right. Click the panel on the wall to open the door. Exit the launch chamber. While you are on this level, go out past the elevator to the other end of the hall. Turn left and see "burning smoke" blocking the way. Click an empty globe on the gas to collect chlorine. Combine it with potassium (from burning a plant or dead branch or raffia) to get Chlorate of Potash.
Observatory
You need Azotic Acid for the next part. Return to the kitchen, put green/yellow compote in the food supply, then go to the lumen-production room and get some Azotic Acid.
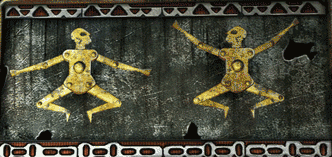
Go back up the elevator to the top level. Exit and go forward once. Pan up and look at the inscriptions. Pan down to the golden figures. Click on their elbows and knees to see that you can move them.
The panel below the golden figures shows how they must look when complete. You can only see one block at a time, and it's not in order. (If you use the Level 2 key in the black keyslot, all blocks will be revealed at once. If you use the Level 3 key, they will be put in order.)
|
You can tell which figure the block is referring to by the ovals at the bottom (or the triangles at the top). Click on the red/orange triangles at the top, bottom, left, and right of the blocks to reveal more pieces of the completed picture.
When solved, a new inscription is revealed at the top, and a drawer pops open at the bottom. Click on the object in the drawer to take it. It's a control panel.
|
 |
Turn left and go forward. Pan left and down and pick up the hopper and the ax. In inventory, combine the ax with a cogged cylinder, then add a colored wheel to make a crushing roller.
Place the crushing roller between the other two at the left of the machine. Place the hopper below the three crushing rollers. Place the funnel on the end of the l-shaped pipe above the crushing rollers. Click the can with Azotic Acid on the funnel to pour the acid into the fuel tank. Click blue ore on the hopper to fill it.
Turn slightly right, and pan up. Find the hotspot that makes Michel say "It's stuck" and grease it. Find the hotspot that makes Michel say "I've got to plug the hole in this tube" and glue it. Pan right and find the hotspot with the handle-shaped indentation. Place a handle in it. (You picked up a handle in the lumen-production room, or perhaps you bought one.) Click on the handle. "It works!"
Place the bent protective cover from inventory under the moving piston that's between the handle and the fuel tank to straighten it out.
Click the empty can on the lumen-well just below the handle to get lumen. In inventory, combine it with the blue fruit + Klipsgaal's light isotope mix you made at the purifier to get Brozludjak's oxygenizing preparation.
|
Exit inventory, turn right and go forward. Place the control panel from the drawer in the spot that makes Michel say "There's a piece missing there." In inventory, combine glue + broken parabolic mirror (from the Hall of Secret Antiquities) to glue it back together. Click the mirror on the apparatus to replace the broken one. Pan down and click on the control panel for a closeup.
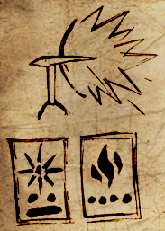
Based on the inscription from the Hall of Antiquities, we need to move the lumen dial to 7 and the fire dial to 4. Click the lumen dial 7 times and the fire dial 4 times. "It works!"
Have a morse-code conversation with earth. When asked if you need supplies, request "Earth plants."
Note: You can click on the parabolic mirror once more to request supplies. You won't need anything, but you'll gain 5 IQ points for collecting whatever you request.
|
 |
Go pick up your supplies!
If you requested a second item, it will be in the blue/yellow forest. You will need to use the can opener to open the outer "box." (Funny, if you requested an extra can opener, you won't be able to get to it until you glue the first one back together.)
The earth plants will be in the blue/red forest. Only one variety of cotton survives. Pick up three bunches of lunar cotton.
Note: You can combine lunar cotton + Azotic Acid to get guncotton. You can also combine cotton + Essence of Klipsaggt + painting from Hall of Secret Antiquities to reveal a more valuable painting below the first.
Exit the Necropolis - Second Time
Enter the necropolis by clicking on the panel to the left of the gates. Return the iron bar, empty globe, lunar tool, and Level 0 key to the Selenite's sarcophagus. Click on the exit panel for a closeup. This time, you have to do subtraction.
Add up the sides of the shapes with green lights, then subtract the sides of the shapes with red lights. Do it 4 times correctly and exit the necropolis.
Selenite Key - Level 3
Now that the investigation is solved, and you've returned the items you stole from the necropolis, you can obtain a level 3 key. (You also need 500 IQ points.) Go to the office of the Selenite dignitary and request one. When you are given a choice of response to the Supreme Lunar Ruler, pick either one, the result is the same: "This audience is over, earthling!"
Return the Selenites to the Forest
Go back to the center of the crater. Make sure the water is feeding the organ (water near lunar reeds needs to flow to the left; water near broken telescope needs to flow to the right). Go to the organ. Plug your level 2 (or 3) key into the black keyslot to the left of the organ - the keys you need to play will now be highlighted.
Play the same songs as before - start with the blue/yellow, purple/red, and green/purple keys. This time, just follow the highlight. (Blue yellow gives life, life gives yellow blue....purple red gives life, life gives red purple....green purple gives life, life gives green purple).
Depending on the setting of the scale on the launch-chamber level, you may release one Selenite right away, or you may have to gather two or three them together on the scale before the door opens. (If for some reason the scale is on "2", you'll have to release two Selenites, then go put the scale on "1", then come back to the organ and release the last Selenite. If you don't change the scale, the last Selenite will be stuck there, and you won't achieve maximum IQ points!) Release all three of them, and the insect spy congratulates you for putting things back the way you found them.
Exit the Necropolis - Third Time
This is necessary only if you want to achieve maximum IQ points. This time, you'll have to do multiplication and division. Multiply the sides of the shapes with blue lights, then divide by the sides of shapes with orange/yellow lights. Do this four times correctly, and the gate opens.
Exit the Necropolis - Fourth Time
This is necessary only if you want to achieve maximum IQ points. This time, you'll have to do more complicated multiplication and division. As before, multiply the sides of the shapes with blue lights, then divide by the sides of shapes with orange/yellow lights. Don't be afraid to bust out the pencil and paper here.
Hint: remember that the result will be a number from 3 to 12...and you don't have to do all the multiplications before you do the divisions - you can break them up into simpler equations, whose results are smaller numbers.
|
In this example, we could do things the hard way and multiply 6 x 5 x 4 = 120, then divide by 3 x 8, or 24, to get 5. Or we could multiply 6 x 5 = 30, then divide by 3 to get 10, then multiply by 4 to get 40, then divide by 8 to get 5.
We could also multiply 6 x 4 = 24, then divide by 8 to get 3, then multiply by 5 to get 15, then divide by 3 to get 5.
|
 |
 |
Here we could take 4 x 9 = 36, then divide by 12 to get 3, then divide by 3 to get 1, then multiply by 7 to get 7.
|
Solve the equations four times correctly, and the gate opens. Congratulate yourself; from now on the exit panel will open the gate automatically - no arithmetic required!
By the way, you can steal back the items from the Selenite's sarcophagus with no ill effect.
Leave the Moon
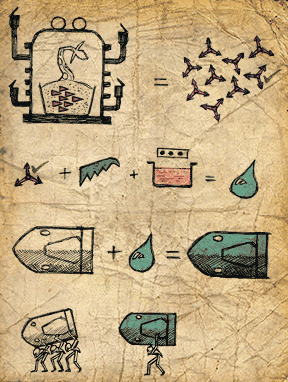
You should have chlorate of potash and oxygenizing preparation in your inventory - one of each is enough. You need three explosives - either guncotton or Prulmis's explosive mixture. (Or, you can use the explosive powder from the barrel or rifle shells if you still have it.) Two are for the retrorockets and one is for the table in the launch chamber. You also need "bolts" (which are actually nuts) and a protective cover for the window. You need the wrench to tighten them.
When you have your needed supplies, go to the launch chamber. Place an explosive on the table and plug the level 3 key into the black keyslot. Enter the capsule. Place the protective cover on the window glass of the open exit-hatch. Place the "bolts" on one corner, then use the wrench to tighten them. Exit the capsule, turn left, and go forward.
|
Now would be a very good time to save your game.
Turn right and look at the launch control panel. Click on the rightmost orange/red arrow to move the flame pointer all the way to the right.
Click on the lever to start the countdown. Quickly return to the capsule (you don't have to bother closing the inner door to the launch chamber). Close the hatch and wait for the ending cutscenes.
Note: You can do the final sequence incorrectly in a variety of ways. Each will add a new cutscene to the "Picture Gallery" on the Main Menu. I suppose my favorite is when Michel launches the capsule but forgets to climb inside before it takes off...
|
 |

Michel Ardan, I presume?
margotbean.com | Game Index
Original images and descriptions are the property of Kheops Studios/The Adventure Company. This page ©2010 margotbean.


