Treasure Island
FAQ & Walkthrough
...at margotbean.com
General Notes
- During the game, press the spacebar to see hotspots. If you don't see them, go to the "Options" menu and turn them on.
- In almost every single case, it doesn't matter what you choose to say in a dialog. You simply can't say the wrong thing.
- Even with hotspots turned on, it's easy to miss some of them. If you're stuck, you probably missed a hotspot.
- Left-click to walk, talk to someone, or pick up an item. Right-click to examine an object (when you see the "eye" cursor).
- Double-click to make Jim run. Right-click to skip dialog. (I found these especially useful.)
FAQ
Chapter I
Q: I know I need water, but I can't raise the bucket at the well!
A: Go back to the cemetery, and take the sword from Benbow's grave. Use it on the well.
Q: I keep clicking on the brandy in the basement of the Benbow Inn, but I can't take it!
A: Bill Bones has to ask for it first. Give him some water, then he'll ask for it.
Q: What the heck is wrong with Jim's spine?
A: Dunno....but I noticed that the Squire has that same pelvic tilt. Perhaps Jim and Antoinette are really half-siblings?
Chapter II
Q: How do I get two pirates to join me?
A: Well, doing that is pretty much the entire chapter of the game!
Q: I know I need to grab the gleaming fish, but I can't!
A: You need to assemble three items first. Check this section of the walkthrough.
Q: I've been all over Bristol, and Long John Silver isn't here...
A: Talk to Israel Hands in the Spyglass Inn - it triggers Long John's first appearance.
Q: I keep trying to talk to Allessandro della Rocca, but the cursor keeps disappearing.
A: It disappears when he is shooting the dice, and reappears when his opponent is shooting. (It took me a while to notice it too!)
Q: I've talked to the guard about the Phantom, but the courtesans won't tell me about Celine...so I can't rescue her!
A: I believe you need to talk to Allessandro della Rocca at the gambling table in the Spyglass Inn first. After that, you (supposedly) know that you need a pair of dice...and one of the courtesans has a die around her neck.
Q: In the Pirate Test - the game is giving me only wrong answers to choose from!
A: You have to walk around Bristol and read the posters first. (Annoying, isn't it?)
Q: Why can't I pick up the !!$!@!@#&! hook?
A: The game won't let you pick it up until the children ask for it. (Most annoying!)
Q: The children won't give me the pirate test!
A: Try talking to Allessandro della Rocca at the gambling table in the Spyglass Inn first.
Chapter III
Q: I opened the safe in the Captain's Cabin before I had the writing kit assembled. When I assembled the writing kit, I clicked on the safe and copied the stores list. Now I can't exit the closeup of the safe!
A: I encountered this bug as well. I had to reload a saved game.
Q: I know I need to heal Joyce, but the doctor won't help me!
A: Go and talk to Long John Silver in the galley.
Q: I've built a rat-trap, but can't find any bait!
A: It's in the galley, on top of the stove (to the right of the boiling green liquid).
Chapter V
Q: I've loaded the cannon with gunpowder and fired, and now Dr. Livesey just yells at me. I'm stuck!
A: There is an area of the blockhouse to the right of Dr. Livesey...go explore that.
Q: When I examine the rum, Jim says "I bet I know who this belongs to." Who does he mean?
A: I don't know either. Of course, I've never actually read Treasure Island...
Chapter I: The old sailors' secret
The Cemetery
- After Dr. Livesey leaves, head right. Left-click on the sword from the statue atop Benbow's Grave to take it into inventory. Exit through the gate to the Admiral Benbow Inn.
The Admiral Benbow Inn
- Walk right a couple of clicks, and through the opening in the stone wall. Enter the Benbow Inn.
- Left-click on Bill Bones to talk to him. If you want to cut right to the chase, choose "Does he want something to drink?" When he responds "Do I like it? Yes, I do." you can figure that there were some last-minute dialog changes at Radon Labs.
- Click on the mug ("pitcher") on the table in front of Bill to take it into inventory. (Walk right or left so you can actually see the mug before you take it, if you like.)
- Walk right, into the bar area. Find the large rum barrels at the forefront of the screen. Move your mouse to the lower portion of the screen to bring up inventory, left-click on the pitcher, then click on the rum barrels.
- Walk back to Bill Bones, take the pitcher of rum from inventory, and click on him.
- After he drinks, exhaust dialogs with him until he says that his throat is dry.
- Take the pitcher, and exit left. Walk left to the well.
- Click the sword from inventory on the well. Click on the sword to raise the bucket. Click the pitcher from inventory on the bucket.
- Enter the Inn, and give Bill Bones the pitcher of water. He asks for brandy.
- When Bill is done talking, walk right, and go down the steps to the cellar.
- Walk forward, then left, and click on on the bottle of brandy.
- After the cutscene, go upstairs. Left-click on Antoinette to talk to her. Keep talking to her until you examine the black spot.
- Exit the closeup of the black spot, and enjoy more dialog with Bill Bones. When he meets his fate, enjoy even more dialog with Antoinette.
- As soon as you have control of Jim, left-click on Bill's chest to take a key. (Right-click on Bill first, if you're not in the closeup.)
- Exit the closeup, and take the shard from the floor above Bill's head.
- Walk up the stairs to the guest rooms. Bill's is the third on the right. Enter it.
- Use the key on the chest. Use the shard on the inside of the lid. Voilà, the treasure map.
- Exit the closeup of the treasure map. When you have control of Jim, leave the guest room.
- After the cutscene, go to the cellar.
- After the cutscene, click on the broom to Jim's left (at the bottom of the stairs) to take it into inventory. Click the broom on the ceiling. (Use the spacebar to see the hotspot.)
- Leave the Inn.
- Choose anything for the dialogs - the result is the same.
Chapter II: Rough customs
Find Long John Silver
- After the cutscene, walk towards the bottom of the screen. At the bottom of the stairs, head right and exit "To the tavern alley."
- In the next area, find the stairs at the left of the screen and double-click on them to "Enter tavern."
- Inside the tavern, walk down the stairs and right a few paces. Pick up the "Match cord holder" propped up against the trunk.
- Walk right and talk to the man with the red cap, Israel Hands. (Choose anything, the result is the same...namely, Long John Silver appears.)
- Choose anything in the dialogs with Long John Silver.
Find a Pair of Dice
- Walk right and up the stairs. Click on the gambling table for a closeup. Wait for the man on the right to shoot the dice then left-click on the man on the left, Allessandro della Rocca. [Note: The dialog cursor disappears when Allessandro is shooting the dice.]
- Choose "I'm looking for people for the expedition"...then anything you like after that.
- Exit the closeup, then exit the tavern.
- Walk right and exit "To the harbour road." Walk right and talk to the guard in the red coat until he tells you about the "périr en mer" tattoo.
- Go back to tavern alley. Walk left past the tavern entrance and find two courtesans (one on the ground, one hanging out a window). Talk to them until they tell you to help Celine get away from the nasty man.
- Walk back towards the tavern entrance until you see Celine talking to the pushy sailor. Talk to him and choose "Hands off!"
- Walk right, exit "To the harbour road", walk right, and talk to the guard in the red coat again. The guards run off to arrest the pushy sailor.
- Walk back to tavern alley, to the courtesans. Talk to them. Collect the die.
- Find the exit to the courtyard behind the courtesans and to the right (labeled "In the courtyard"), and take it.
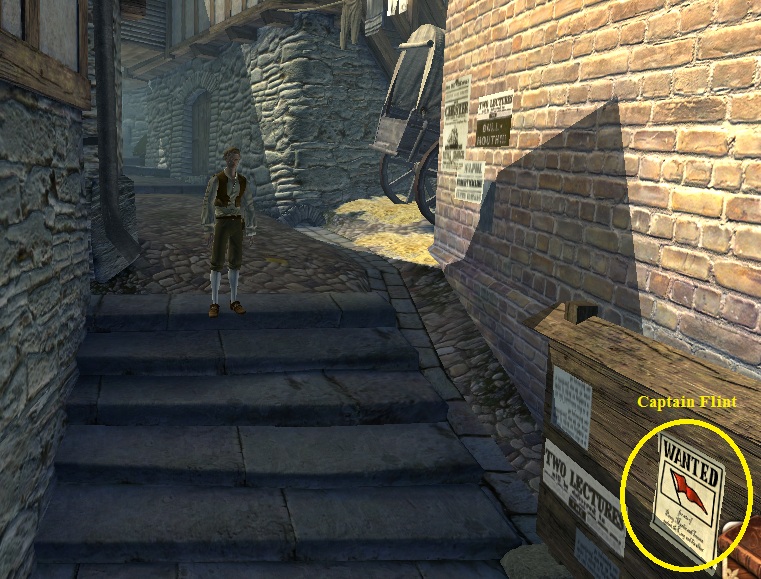
- Walk around to the left and click on one of the children. Talk to them until they decide to give you a pirate test. The answers to the pirate test are found on posters around Bristol (right-click on the posters to read them).
Pirate Test Answers
Note: If you haven't read any of the posters around town, then the game will provide you with only wrong answers...forcing you to go around and read the posters.
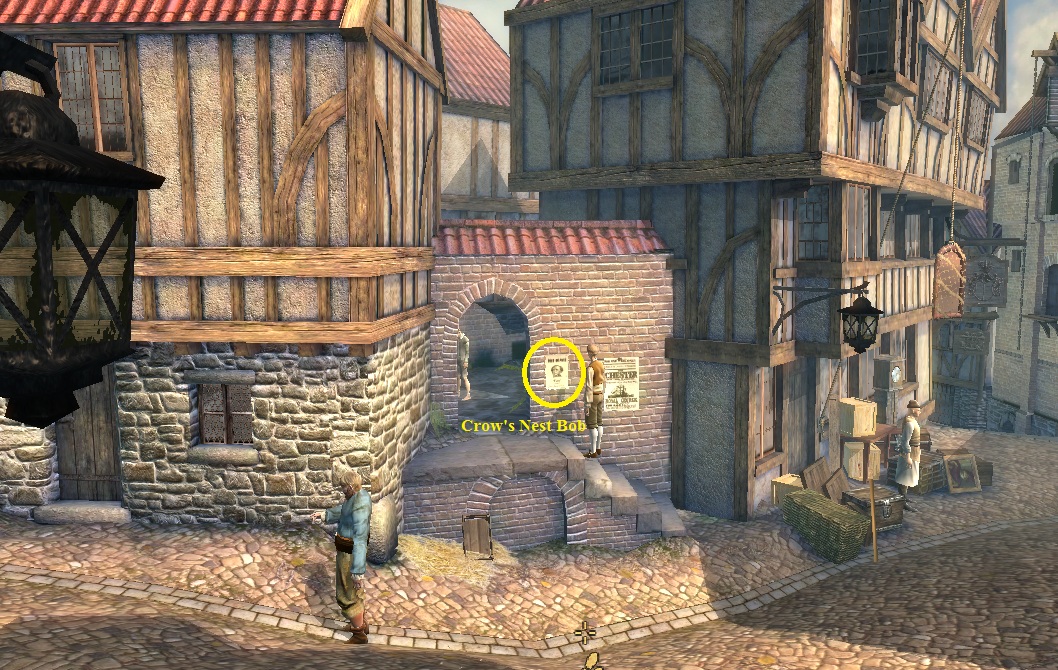 Location: Just outside the archway from the children |
Wanted: Crow's Nest Bob
|
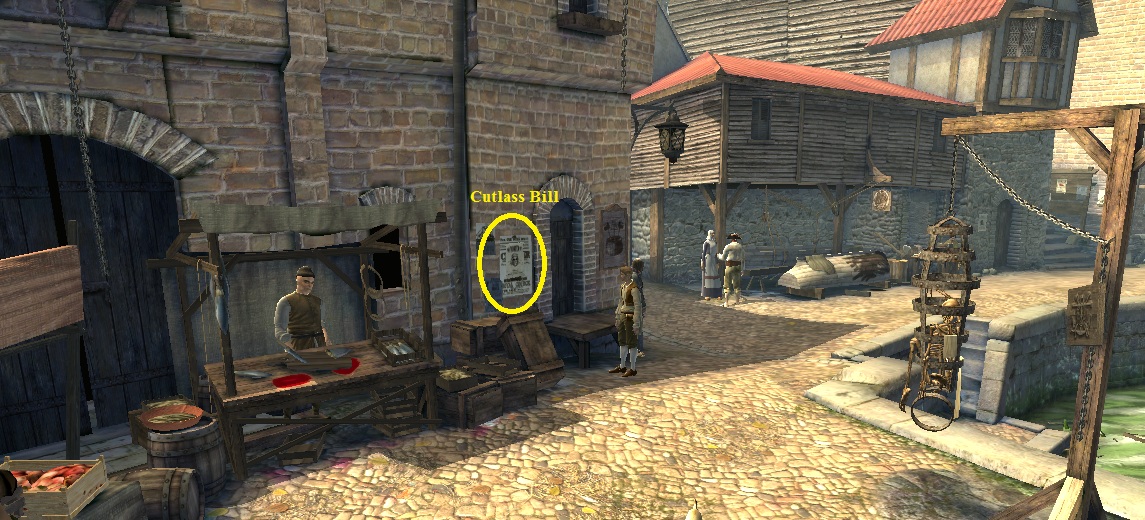 Location: At the harbor, left side, near the butcher. |
Wanted dead or alive: Cutlass Bill
|
|||
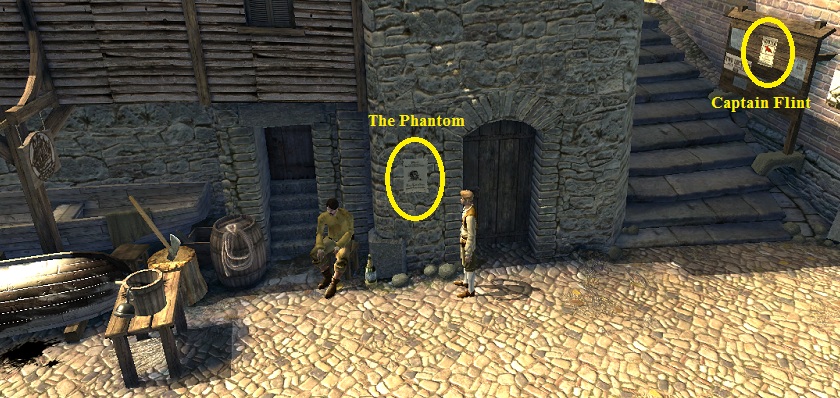 Location: Middle of the harbor, to the right of the man in the green shirt. |
Urgently sought: The Phantom
|
 Location: Middle of the harbor, alley to the right of the man in the green shirt. |
Wanted dead or alive: Captain Flint
|
- Once you've passed the pirate test, the children insist that you give them a memento from your pirate travels. Leave them, and go to the harbor. Find the man with the green shirt, and right-click on the bucket on the table to the left of him. In the close-up, left-click on the hook to take it into inventory. Exit the closeup.
- Return to the children and click on them with the hook. Finally, they give you their die. In inventory, click on one die, then the other to combine them and make a pair of dice.
- Exit through the archway behind and to the left of the children.
Find George Mary's Talisman
 The knot hotspot |
|
- While standing near the cage, you should see a flight of stone steps leading down to the water. Go down the stone steps. In the water to the right, amongst the other debris, is George Mary's talisman (the "gleaming fish"). In inventory, combine the match cord holder (from the Spyglass Inn), the iron ring, and the net to make a dip net. Click the dip net on the gleaming fish in the water. You now have George Mary's talisman.
Hire Two Crewman
- Return to the Spy-Glass Inn. Down the steps, and walk right and around until you see George Mary to the right of Long John Silver. Click the talisman on him. He agrees to sail with you.
- Walk right, to the gambling table. Click on it for a close-up. Click the dice from inventory on Allessandro. After the cutscene, exit the tavern. Walk past the courtesans and exit left to harbor alley.
- Walk down the steps until you see Allessandro on the right. Talk to him until he agrees to sail with you.
- Return to the tavern and click on Long John Silver.
Chapter III: A storm is gathering...
Check on the Treasure Map
- After the opening dialog, walk left and down the steps. Continue walking left to the next set of stairs. Instead of going up, though, enter the door to the passenger area.
- Inside your cabin, you discover the map is missing. Click on the floor to take string.
- Exit left, then enter Mr. Joyce's cabin to the left. Click on him to talk to him (choose anything for your responses). [Notice how his three repeating groans are more annoying than a dripping faucet?]
- Right-click on the medicine bottle on Joyce's nightstand.
- Exit right and run into Israel Hands. Choose anything for your responses. After he leaves, return to the upper deck.
Heal Mr. Joyce
- Talk to Dr. Livesey at the bow of the ship. Choose "Joyce is very ill," then anything.
- Walk left and down the stairs. Enter the galley to Jim's right. Talk to Long John Silver.
- In the galley, walk towards the bottom of the screen as far as you can. Take the "food scraps" from the frying pan on top of the stove.
Obtain a Piece of Cloth
 |
|
Obtain Greens
- Walk back down to the galley, then slightly right and exit to the fo'c'sle.
- Right-click on the stores hatch at the bottom left of the screen to see that it's locked.
- Walk left and take the axe stuck in the wooden post. Take the pitcher from the floor to the left of the axe.
- Walk left and take the water dipper hanging on the fresh water barrel. Click the dipper on the barrel to get "water dipper with algae."
- While you're here, talk to George Mary until you tell him you need his talisman.
- Walk left to the next area. Click on the stick in the ceiling to take it into inventory. (Hit the spacebar to see the HUGE hotspot.)
Obtain the Stores List
- Exit left up the stairs to the passenger area, then exit to the upper deck.
- Walk left, and click on the door to the captain's cabin. He yells at you.
- Walk right, down the stairs, and find Sailor Dick. Talk to him, and choose "What does he think of Captain Smollett?"
Note: If this dialog option isn't available, you haven't clicked on the stores hatch and/or clicked on the captain's cabin door. (To see this option, you must also have talked to Long John Silver about the healing soup.) - For the next set of dialogs, you must choose "Douse the lee sheet" and/or "Easy to starboard" and/or "Hoist the tops'l" three times in a row. (These are not the commands Captain Smollett gave, but they are commands that Sailor Dick can follow.)
- Once the captain leaves his post, walk left and enter his cabin.
- Walk left to his desk, and right-click on the nautical chart for a close-up.
- Pick up the quill, then click it on the inkwell.
- Click the scrap of cloth from inventory on the inkwell. Exit the closeup.
- Walk left, and pick up the scroll of paper.
- Walk right, and right-click on the safe. The combination is 017-076. (The coordinates for Port Royal on the nautical chart.)
- Left-click on the handle to open the safe.
- In inventory, combine quill with ink and scroll of paper to get a writing kit. Click the writing kit on the stores list.
- Exit the captain's cabin.
Get Some Rum
- Return to Long John Silver, give him the copy of the stores list, and get the key to the stores hatch.
- Exit to the upper deck, and click the cloth with black spot on the large ventilation grate in the center of the ship. (If nothing happens, you haven't talked to George Mary until you tell him you need his talisman.)
- Go to the fo'c'sle, and talk to George Mary until he gives you his talisman.
- Walk right, and use the key on the stores hatch. Once it's unlocked, go on down to the storeroom.
- Walk left as far as you can until you see the rum barrels tied with rope. Use the axe on the rope. Use the talisman on the rum barrels, then use the pitcher on the rum barrels to get a pitcher of rum.
Obtain Fresh Meat
- In inventory, combine stick, string, bucket, and food scraps to make a rat trap. Find the rat that's running around down here in the storeroom, and click the trap on him.
Get the Healing Soup
- Return to Long John Silver in the galley, and give him the dipper with algae, the rat, and the pitcher of rum.
- He says he needs to be alone to make the soup. Exit and reenter the galley. Click on Long John and get the soup.
- Return to Joyce's cabin and give him the soup. He falls asleep, and Jim remarks that he needs cold water to wake him.
- Return to the fresh water barrel, and click the dipper on it.
Get the Treasure Map
- After the cutscenes, go to Joyce's cabin and talk to him. Choose any option for your responses.
- Leave Joyce's cabin and run into Antoinette. Choose anything for the dialogs. When she runs off, follow her to the upper deck.
Save Antoinette
- For this next sequence, you have to get all the way to the bow of the ship. Timing is important!
- Use the spacebar to see your next hotspot. Click on it just after a large wave washes over the deck.
- First, go right to the railing. Then left to the lifeboats. Then right to the railing, then up the stairs.
- When you reach Antoinette, choose anything for the dialogs, then watch the cutscenes.
Chapter IV: Land ahoi!
The Swamp
- After the cutscenes, walk right, then exit left to the swamp.
- Walk right until you come to the camp.
- Click on the British flag. Jim copies a drawing into his journal.
- Walk towards the bottom of the screen. Click on the "shiny object" at the right of the screen. Jim falls into a trap.
- Use the spacebar to find the hotspot marked "pouch" just below the hole. Click on it to take the pouch.
- In inventory, right-click on the pouch to get a hammer. Exit the closeup, and Jim takes the leather straps from the pouch.
- Click the leather strap on the root above the hole. Jim climbs out.
- Exit the swamp, and go back to the clearing.
The Clearing
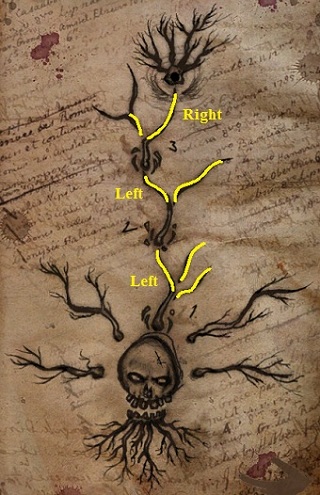
- This is not necessary, but you can right-click on the gravestones to read them. From left to right they are:
- One-eyed Joe [day 7]
- Arthur Will Jones the First [day 4]
- Four-knife Roy [day 2]
- Trident Scott [day 6]
- If you put them in ascending order of the day they died, the words in their names form the sequence 4 1 3 1. This is the solution to the next puzzle, the jungle maze.
The Jungle Path
- Walk right from the clearing with the gravestones, and enter the jungle.
- From here, walk towards the top of the screen, and exit.
- Walk to the right of the screen, but do not exit. Walk until you see that there are three paths branching out from you. Take the middle path (the one with 4 stick figures).
- At the next screen, exit towards top right (the exit cursor is actually more at middle right, I guess).
- Then exit right, to the path with 1 stick figure.
- Walk left to the end of the next screen, and exit left.
- Walk to the left of the next screen, but do not exit. Walk until you see 3 stick figures at the top middle of the screen. Exit there, at the top middle.
- At the next screen, locate the 1 hanging figure at the right, and exit there.
- Then go right to the end of the screen and exit.
- You are at the fort!
The Fort
- Walk right to the blockhouse. Click the hammer on the entrance door. It breaks.
- In inventory, click the hammerhead on the upper arm bone. Click the "provisional hammer" on the entrance door.
- Enter the blockhouse.
- Pick up the piece of wood from the floor.
- Right-click on the stairs.
- Exit the blockhouse. At the left of the screen, exit to the clearing.
- At the clearing, walk left the the grave with sabres attached (2nd from left).
- In inventory, click the piece of shell on the piece of wood and make a saw.
- Click the saw on the sabres. Pick up the sabres.
- Return to the fort. Enter the blockhouse, and click the sabres on the stairs. Go up to the roof.
- Click the British flag from inventory on the flagpole (to the left of the cannon).
- Watch the cutscenes.
Chapter V: Hunter and hunted
The Fort
- At the first dialog, you can choose to help Long John Silver or not...the result is the same.
- When you have control of Jim, walk right, behind Dr. Livesey (yes, there is an area to explore there!)
- Pick up rum and coconut shells from the table.
- Walk left, towards the underside of the staircase. Click on Livesey's medical bag.
- In inventory, right-click on the paper bag to get chemicals. While in the closeup, spin the bag around... OR exit the closeup and right-click on the bag a second time...to get instructions for consructing a flash bomb:
- Thicken the chemicals to a malleable dough with solvent.
- In a vessel, roll the dough into small balls.
- Add gunpowder to the balls.
- Fill the balls into shells.
- Firmly tie the shells together with rolls of cloth.
Make a Flash Bomb
- In inventory, combine chemicals and rum to make chemical pulp.
- Click the chemical pulp on the cauldron in the blockhouse to make little balls.
- Walk left. Take gunpowder from the barrel by the door.
- In inventory, combine gunpowder and little balls to make gunpowder balls.
- In inventory, combine gunpowder balls and coconut shells, then add rolls of bandages to make a coconut bomb.
- Take more gunpowder from the barrel.
- Go up to the roof. When you get there, take the small piece of wood from just above your head.
- Click gunpowder from inventory on the far end of the cannon. Click the coconut bomb on the far end of the cannon.
- Click the small piece of wood on the near end of the cannon, on the hotspot labeled "touch hole."
- After the cutscene, exit the roof. Automatically end up outside the blockhouse.
- Walk left, and keep walking until you find the "hole in the fence" exit. Take it.
The Swamp
- At the next screen, walk right and see that you are at the swamp camp. Keep walking right until you encounter Ben Gunn. As always, choose anything you like for the dialogs.
- When Ben Gunn walks away, follow him until you can see the boat in the water. Click on it.
- Talk to Ben until he agrees to lend you the boat in exchange for cheese.
The Hispaniola
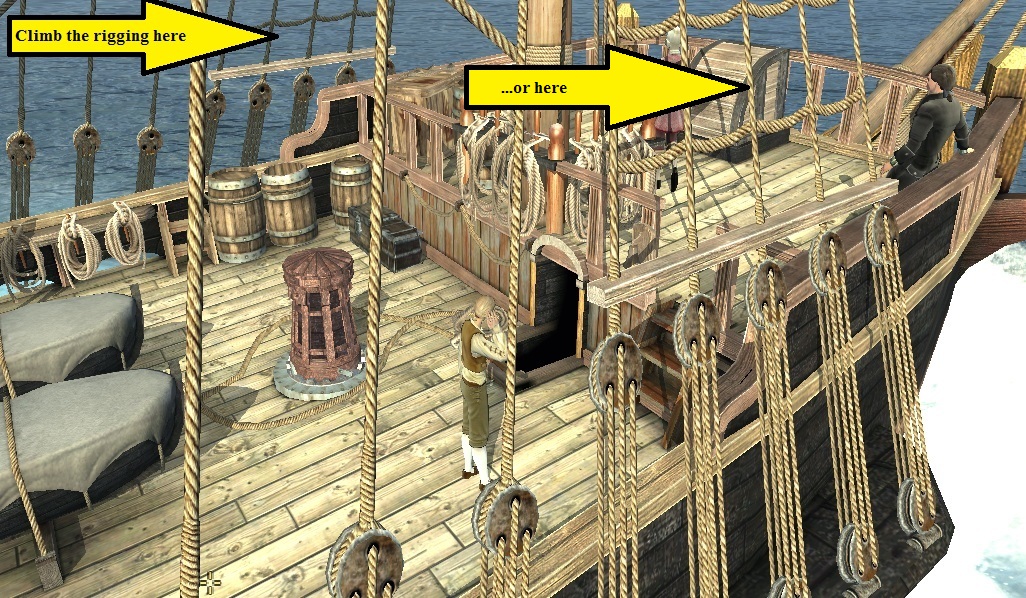
- Take the boat. After you hear Antoinette yelling, exit right. At the next screen, take the exit marked "anchor cable."
- On the boat, walk left to the ventilation grate. After the cutscene, continue left to the captain's cabin. Enter and talk to Antoinette.
- Exit the captain's cabin. Go down to the passenger area, and enter Livesey's cabin. Take the walking stick from the floor, the powder from the bed, and the cheese from the stove by the door.
- Return to the upper deck. Take the rag from atop the ventilation grate. In inventory, combine rag and walking stick.
- To the right of the ventilation grate is a petroleum puddle. Click the "walking stick with rag" on the petroleum puddle.
- Walk left, all the way to the end of the ship, and click the "walking stick with soaked rag" on the stern lamp to make a torch.
- Walk right, all the way past the petroleum puddle, to the anchor cable. Click the torch from inventory on the anchor cable.
- Choose anything in the dialogs with Israel Hands. When you're done talking, click the powder from inventory on Israel Hands.
- Take the knife from the deck just behind Jim.
- Return to the captain's cabin and click the knife on Antoinette. Exit the cabin.
- After you give Ben Gunn the cheese, choose whatever you like for the dialog.
Chapter VI: Piaster Piaster
 |
|
Original images are the property of Radon Labs/HRH Interactive. This walkthrough ©2011 margotbean.