Safecracker
The Ultimate Puzzle Adventure
Walkthrough
...at margotbean.com
You can buy Safecracker the Ultimate Puzzle Adventure (released in 2006) from several sites, including Steam and Amazon.
You can also buy the predecessor "Safecracker" (without "Ultimate Puzzle Adventure" in the title) which was released in 1997 or so, but it's really hard to find. You can search Amazon, but be sure to read the item descriptions and don't rely solely on the item pictured!
The story: Eccentric billionaire Duncan W. Adams has disappeared. The family has hired a specialist (you) to find his will, which is hidden somewhere in his mansion.
For safe solutions, click on the maps below. To find out where to use a particular item, see the ITEMS section.
You can also follow along the path I took through the game. It starts where the game starts, at the front doors in the Hall. Turn right and go forward twice. Click on the safe for a closeup.
|
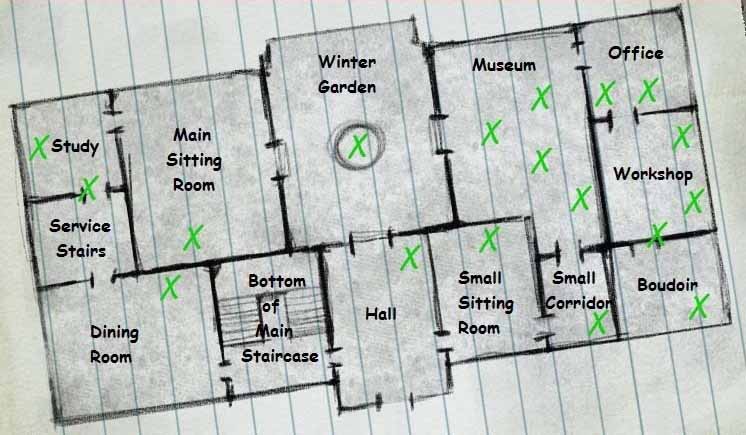
The Ground Floor
|
|
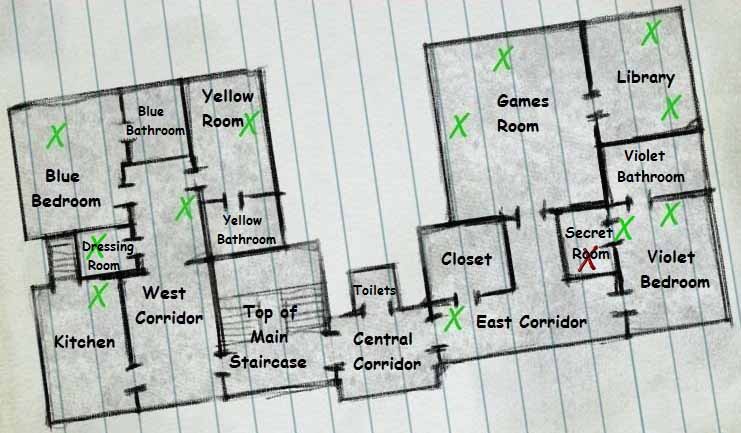
The Second Floor
|
|
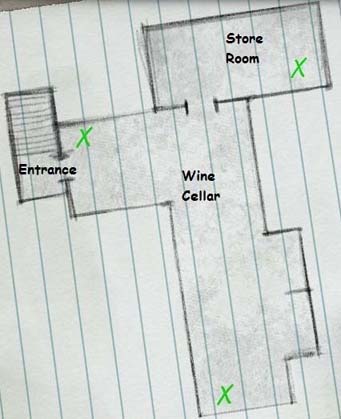
The Basement
|
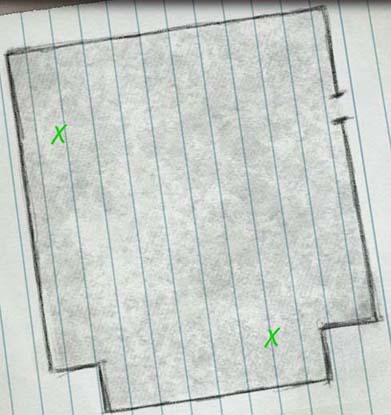
The Loft
|
GROUND FLOOR
Study
Column Safe
 |
Go to the panel sitting atop the small column, near the window. Objective: Move the little ball into one of the holes by clicking on the magnet buttons. Solution: (U = up, R = right, D = Down, L = left) – U R D L D R D L U R U R U R D R D L U R D. Take the 4-pin circuit. We now have all the parts necessary to open the door in the Office. |
Study Door
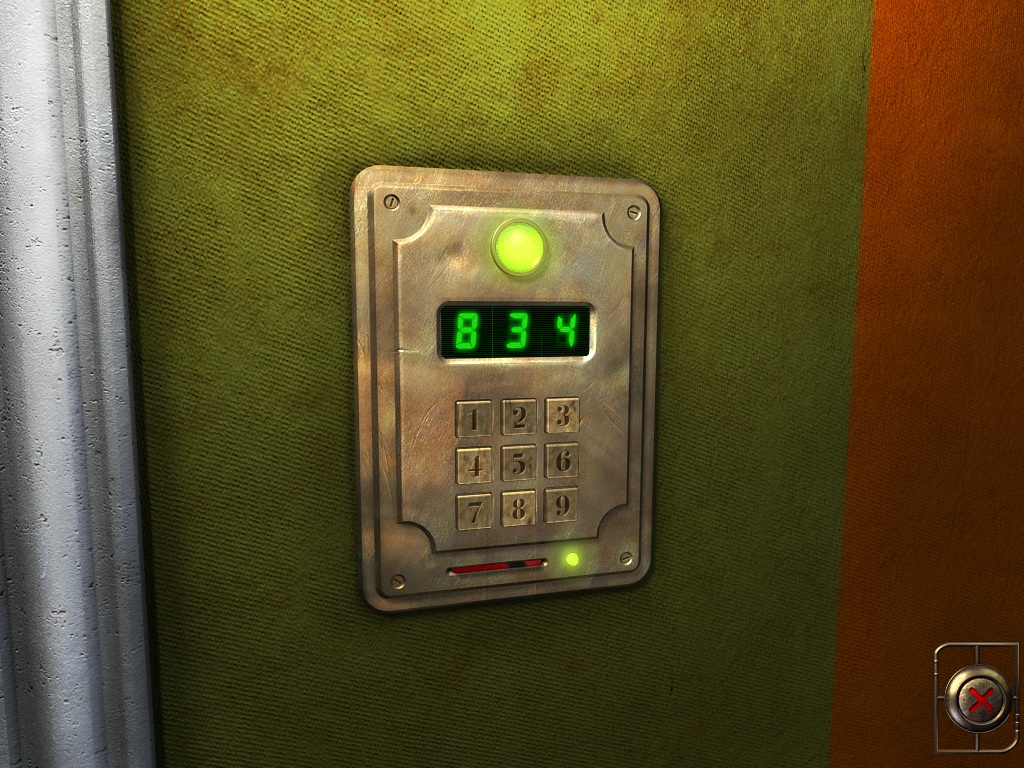
Place the magnetic card from the Broken-Keypad Safe (in the Workshop) into the slot on the keypad. Look at the keypad, and notice that three buttons are lighter than the rest. The code is 8 3 4. The door opens. Go forward twice to the Dining Room. |
 |
Dining Room
|
There's a safe behind a picture on the far wall, and several paintings on the left. Objective: Arrange the paintings in the correct order to open the safe. Solution: Look at the picture obtained from the safe in the Main Sitting Room. We need to put the lady with the red hat on the left, then the wide painting, then a space, then the woman in the white dress, and finally the rooftop view. |
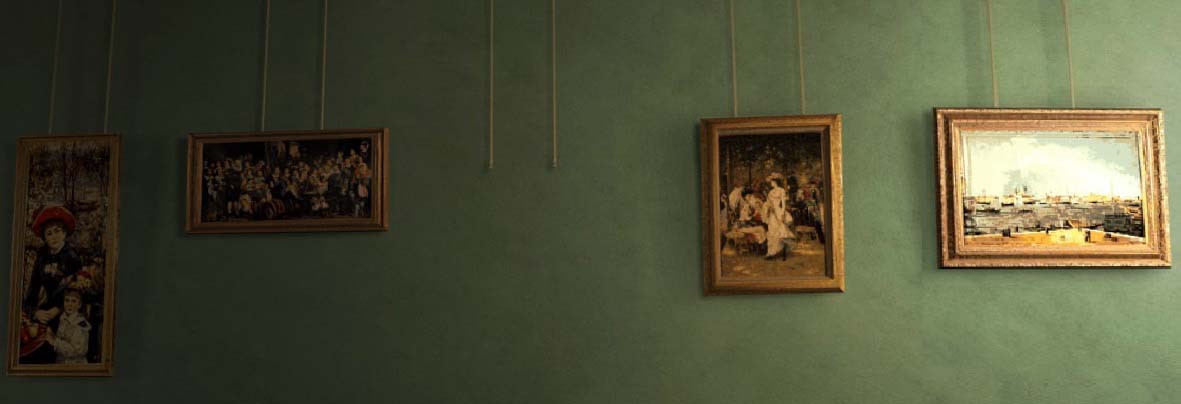 |
When correctly arranged, the safe opens. Take the letter from Hubert Dufigue De Pouillot. Head back to the Workshop.
Main Sitting Room
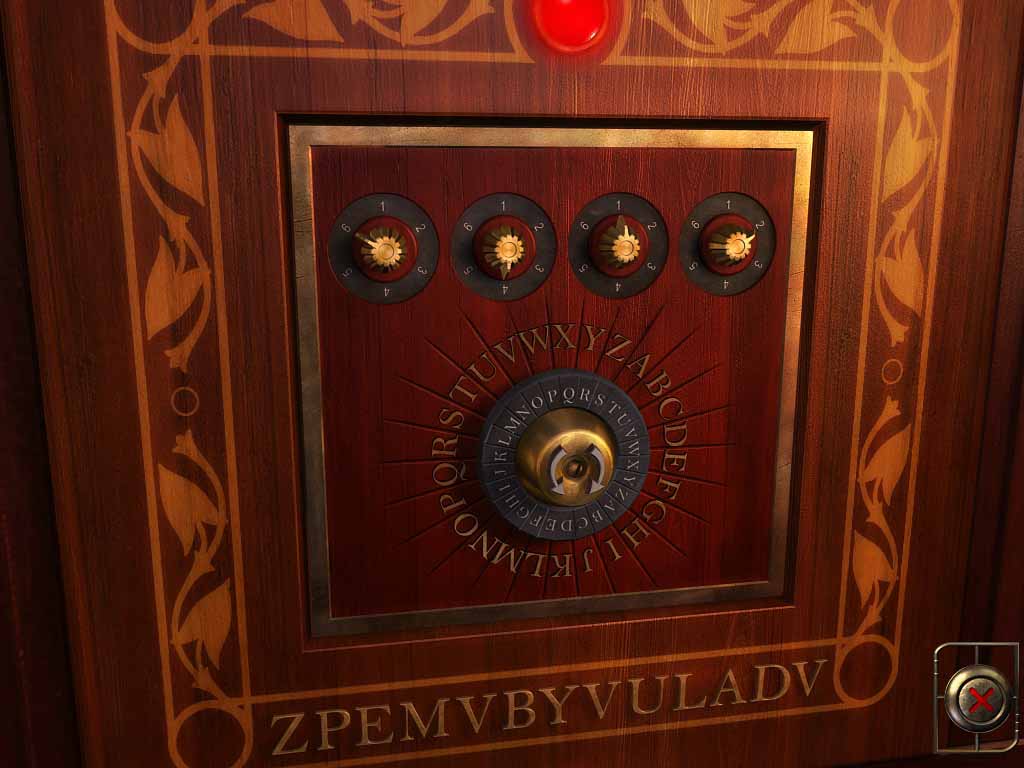 |
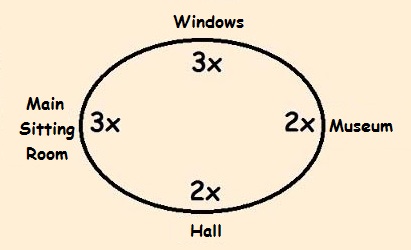
If you've entered from the Winter Garden (the room with the fountain), the safe is on your left. According to the paper you obtained from the safe in the Museum, L = E. Click on the left (downward) arrow ten times, so that the outer L lines up with the inner E. The letters at the bottom of the safe translate to:
Enter 6 4 1 2 on the dials. Take the photo and 8-pin circuit. Next stop: the Study. |
Winter Garden - Fountain Puzzle
Enter the Winter Garden from the Hall (where you first started out). Pan down and place the fountain plug that you obtained in the Games Room.
|
Objective: Raise the key in the center of the fountain so you can grab it. To do so, each of the four fountain plugs must be turned until you see a water stream flowing from it to the fountain.
|
 |
Solution: Start from the entry point from the Hall. (If you need to, just walk away from the fountain to reset it.) Turn left and go clockwise around the fountain twice, then take two more steps, to end up at the plug opposite the Hall, near the windows.
Take the double key. Now we're going to the Museum to complete the raised panels.
Hall
Right-click to bring up inventory, then left-click on the paper obtained in the Small Corridor to examine it - 4298. Right-click twice to close inventory. Enter 4 2 9 8 on the keypad to the right of the double doors.
Go on in, then turn slightly right and go forward. Click on the double doors to open them. Turn slightly right and go forward to the first Museum safe.
Small Sitting Room
Use the T-shaped key obtained in the Workshop to open the cabinet. Take the piston and head to the Basement. (Go back to the Study, then through the door you opened with the red magnetic card, into the little room with green walls, turn left, and go down the stairs.)
Bottom of the Main Staircase
At the far end of the Dining Room is a locked door. Open it with the brass key you obtained in the Basement. Go through it to the Bottom of the Main Staircase. (It would be a good idea to open the bolted door to the Hall while you're here.)
If you're following my path through the game, then go up to the Second Floor, to the Kitchen. (At the top of the stairs, turn right and go forward to the bolted door. Open it, and go through to the kitchen.)
Museum
First off, head to the right and open the bolted door - it goes to the small hallway where you cracked that first safe. From the point where you unbolted the door, turn left and click on the corner safe for a closeup.
Corner Safe
|
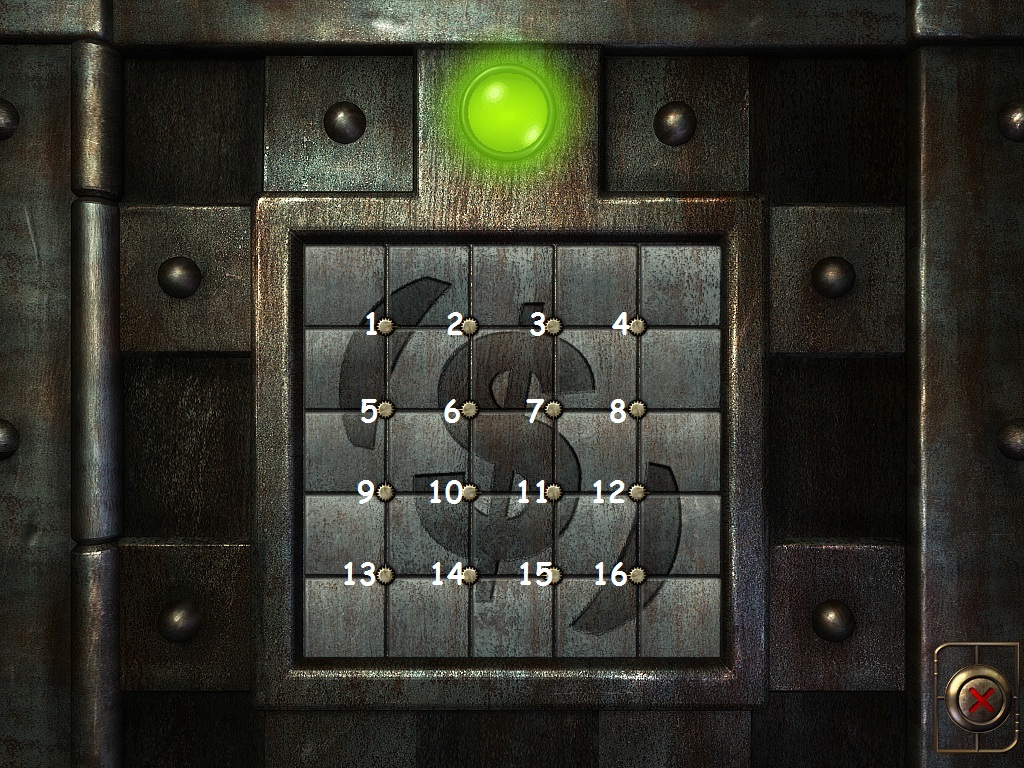
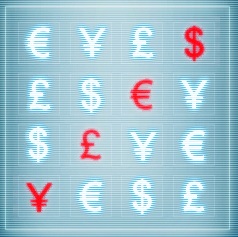
Objective: Reassemble the picture by clicking on the round silver buttons. After a few clicks, our boy will say he's seen the pattern somewhere before. It's actually in the menu background, under the phone cord: |
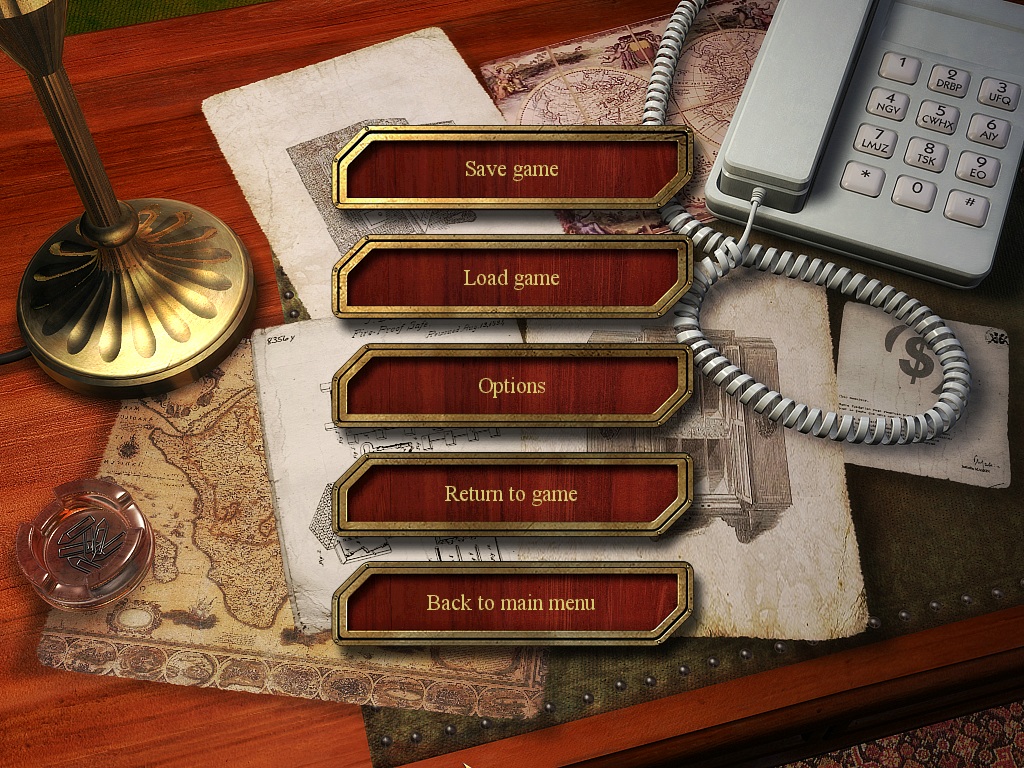 |
Solution: Number the silver dials from left to right and top to bottom as 1 through 16. Click on the dials in the following order:
|
|
|
|
|
|
 |
Completing this puzzle brings up a good time to save your game.
Take the paper from the top shelf, then pull the handle on the lower shelf. See three panels raise up from the Museum floor. We can solve two of them now:
Sudoku PanelObjective: This is a sudoku-type puzzle. (Place the symbols so that there is one of each in every row and column.) Here is one solution:
|
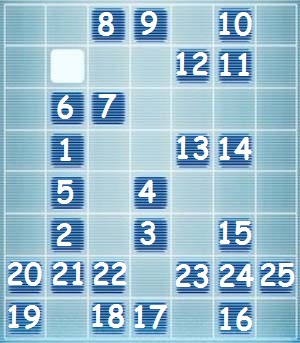
Disappearing Squares PanelObjective: Click on adjacent squares until all disappear. Hints: You cannot move diagonally, but you can skip one square/space and go to the next. You can have one square left and still win. Solution: Click on the squares in this order:
|
If you're following along chronologically, you don't have the code to the third panel yet... so your next stop is the Office.
Final Museum Panel |
||
|
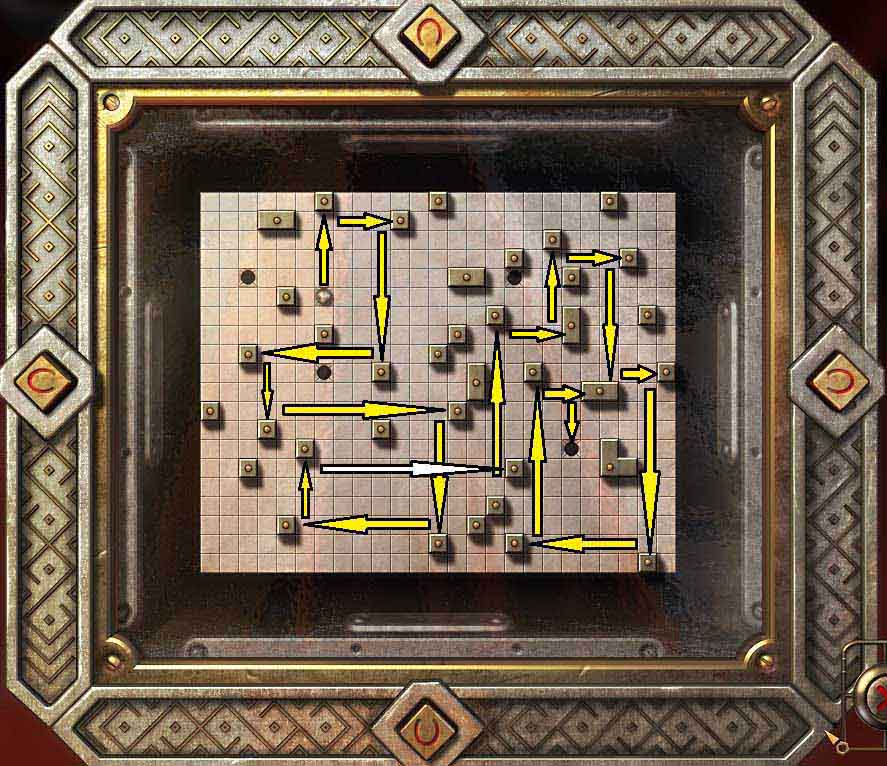
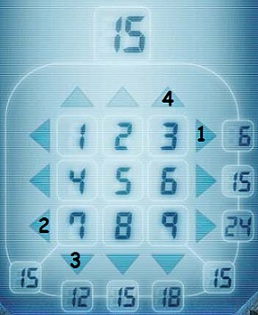
Enter the code from the paper you obtained by winning the Racing Game in the Games Room: 6821. A magic square is revealed. Objective: Rearrange the numbers so that each row, each column, and the two diagonals add up to 15. Solution: Click on the arrows in the order shown (top row right once, bottom row left once, leftmost column down once, rightmost column up once) to obtain: 8 1 6 See the door in the Games Room open. If you're following along with my links, you need to head to upstairs, but not to the Games Room just yet. At the point where you would turn left to go to the Games Room, instead go straight to the door at the end of the East Corridor. |
 |
|
Office
You get to the Office through the Museum. Start by facing the sudoku panel (the one near the window), then turn left and go forward once.
Column Safe
Once inside the office, turn right and go forward. Pan left and down, and click on the panel atop the small column.
Objective: Click on the symbols in order. When you have the right sequence, the buttons will stay down. A wrong move causes all buttons to pop back up.
Solution: Click on the buttons in the order shown:
 |
 |
Finally, click on the red button. Pan up to see the laser beam that's appeared. Click on the mirror near the ceiling to direct the laser across the room. Click on the second mirror (over the globe) to direct the laser beam down. The globe opens. Click on it to take the transistor.
If you're following along chronologically, your next stop is the Main Sitting Room.
Office Door
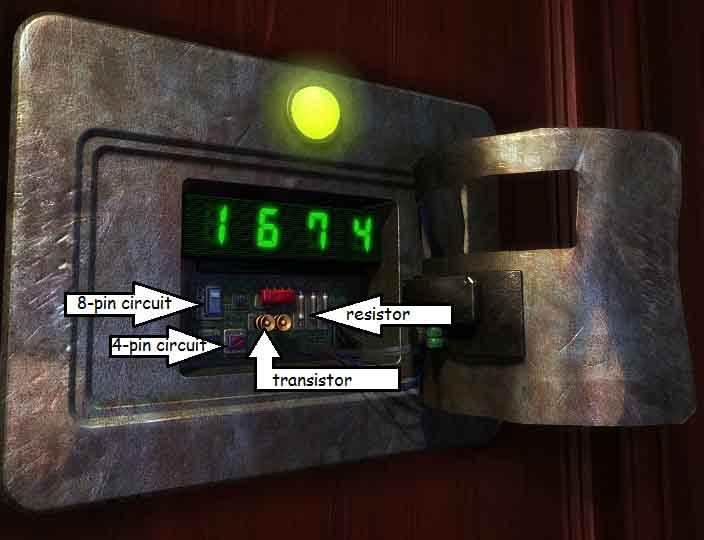 |
Zoom in on the panel to the right of the door for a closeup. Place the 8-pin circuit, 4-pin circuit, transistor, and resistor on the panel. The door opens. Enter the Workshop. |
Workshop
Broken Keypad Safe
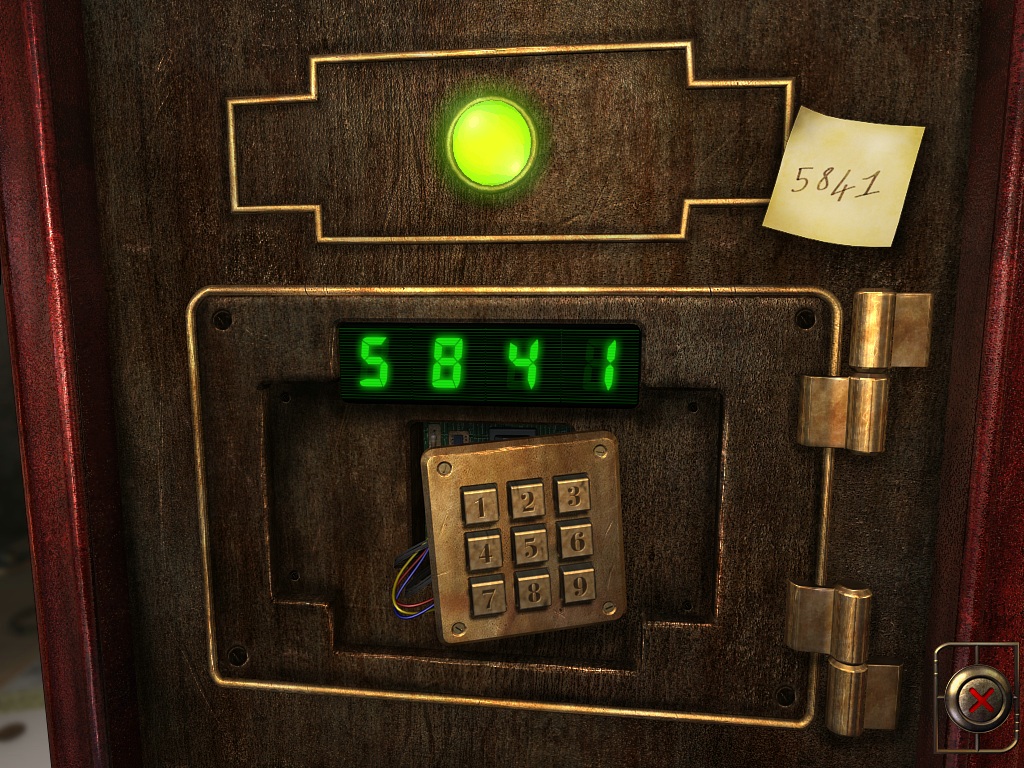
Objective: According to the sticky note, we need to enter 5841.
By pressing one number repeatedly, you see that it repeats its pattern after five sets of four numbers. If you do this with all numbers, you will have a table that looks like this:
|
 |
The numbers I used for the solution are in red.
Exit the closeup to reset the safe. Now, if you press 2366 (in any order) you "set" those keys to the right spot, so that the next keypress will produce the numbers we need (8, 4, 5, and 1). Entering 3226 (in that order) will then produce 5841.
Other solutions: press 3455, then 6699, then 3456. Or, press 1112, then 3366, then 3216. Or, press 8884, then 9922, then 8429.
Solution: Enter 2 3 6 6, then 3 2 2 6. Take the magnetic card. Next stop: the Study.
Workshop Laser Safe
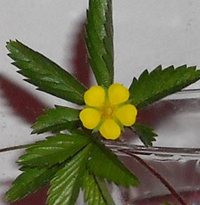
(a buttercup from my garden)
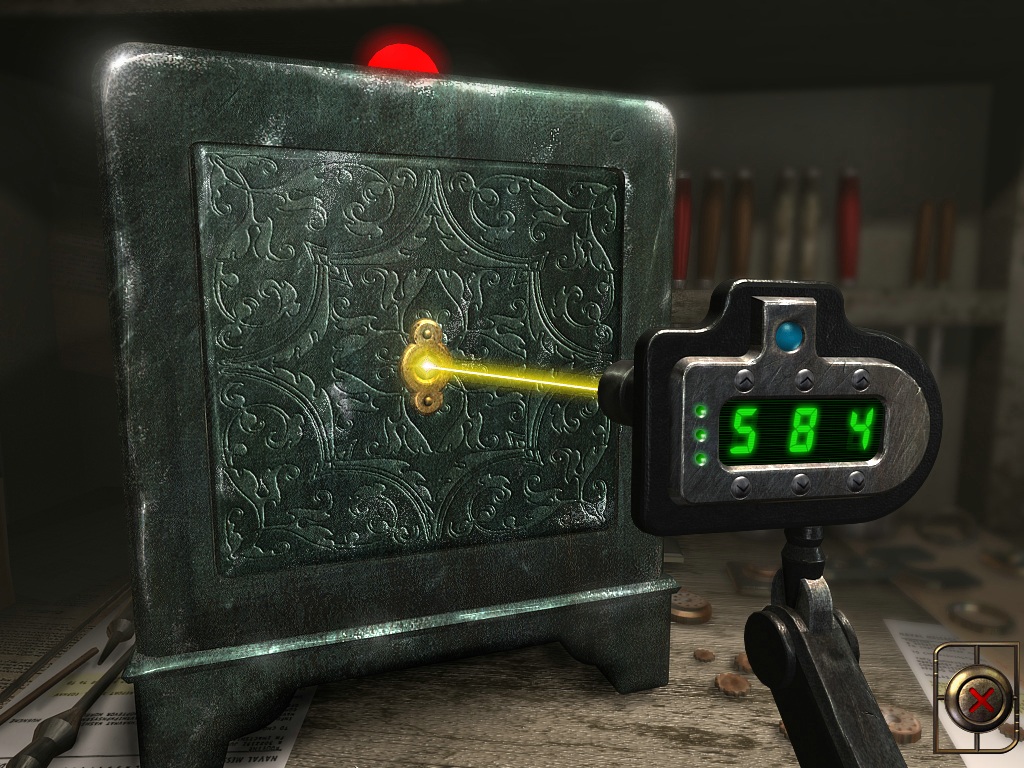
Objective: According to the letter obtained in the Dining Room, "The wavelength required to unlock the safe is 8nm under the upper limit of a Buttercups color." Enter the wavelength, then wait for the three green lights on the left of the panel to light up.
Solution: By playing around with the colors for several hours (almost), you see that yellow is 592 and orange is 593. Buttercup flowers are a rich yellow color, so take the upper limit of yellow (592) and subtract 8 to get 584. Enter 5 8 4.
Take the small gold key and T-shaped key. Head to the Small Sitting Room to use the T-shaped key.
Dials Safe
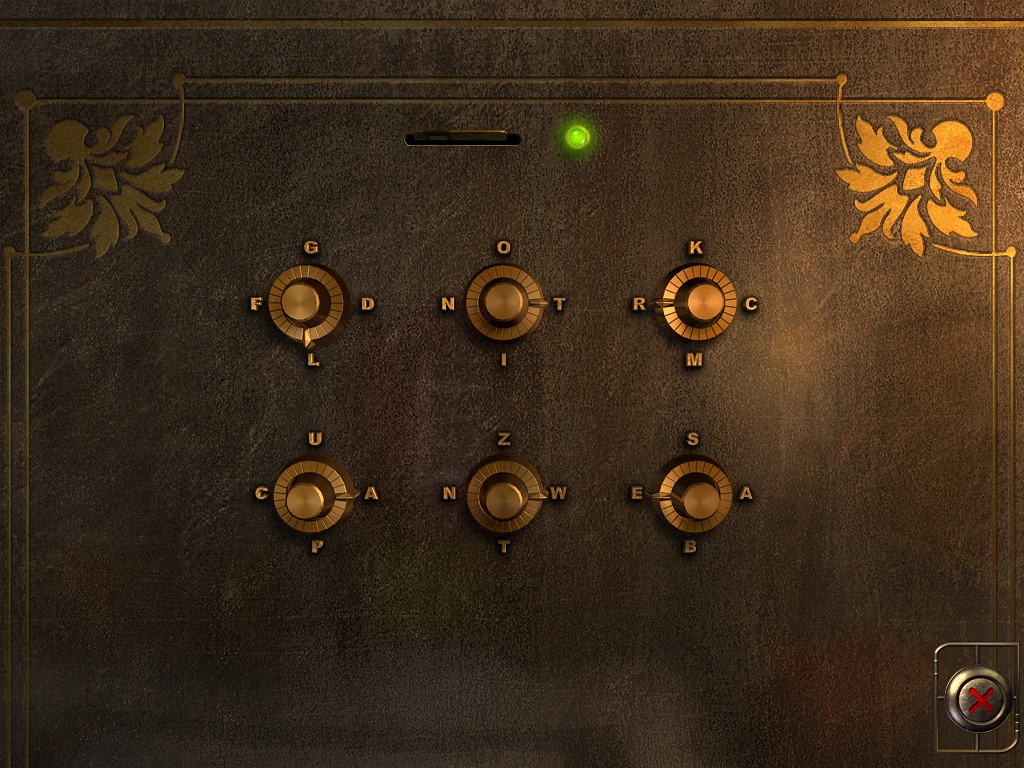
Place the chip card obtained in the Blue Bedroom in the slot at the top of the safe. Solution: Based on the letter from Margaret obtained in the Blue Bedroom, the solution to this safe is the name "Walter." Enter (from left to right, top to bottom) L T R A W E. The door to the Boudoir opens. Go on in. |
 |
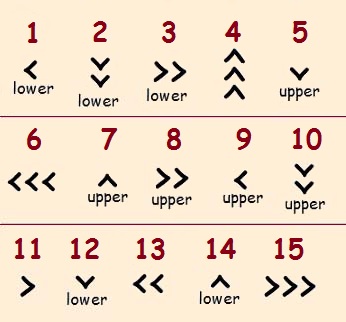
Small Corridor
Objective: Move the green gems to the left, the blue gems to the right, and the red gems to the bottom.
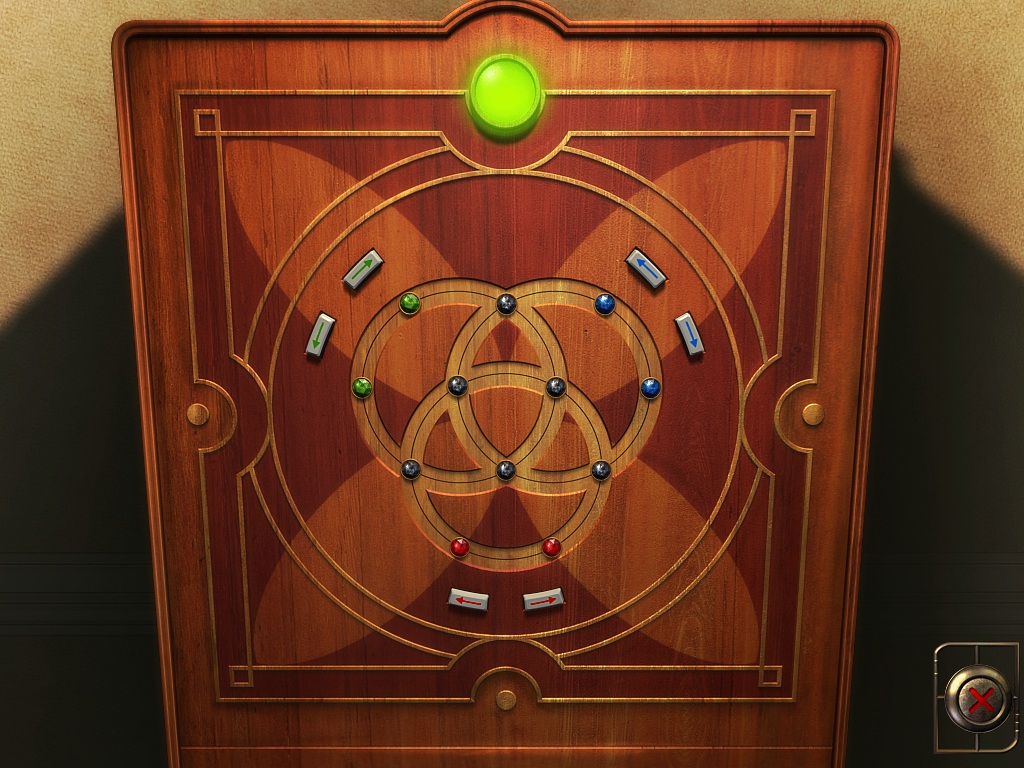 |
Solution: Click on the arrow buttons in the following order:
|
Take the resistor and the paper from the drawer that opens, then head back to the Hall (where you first started) by turning around and going forward twice. Once there, turn right and go forward to the double doors.
Boudoir
Objective: Free the key by sliding it out the right side. Click on the round magnet at the left to pick it up. You need the magnet to move the pieces.
 |
Solution: Number the pieces as shown in the picture. Move:
|
The path out is now clear. When the key is free, right-click to put the magnet back, then left-click on the key to take it. The green "success" light will light up when you have taken the key. Head upstairs to the East Corridor.
SECOND FLOOR
Kitchen
Dumbwaiter/Elevator Puzzle
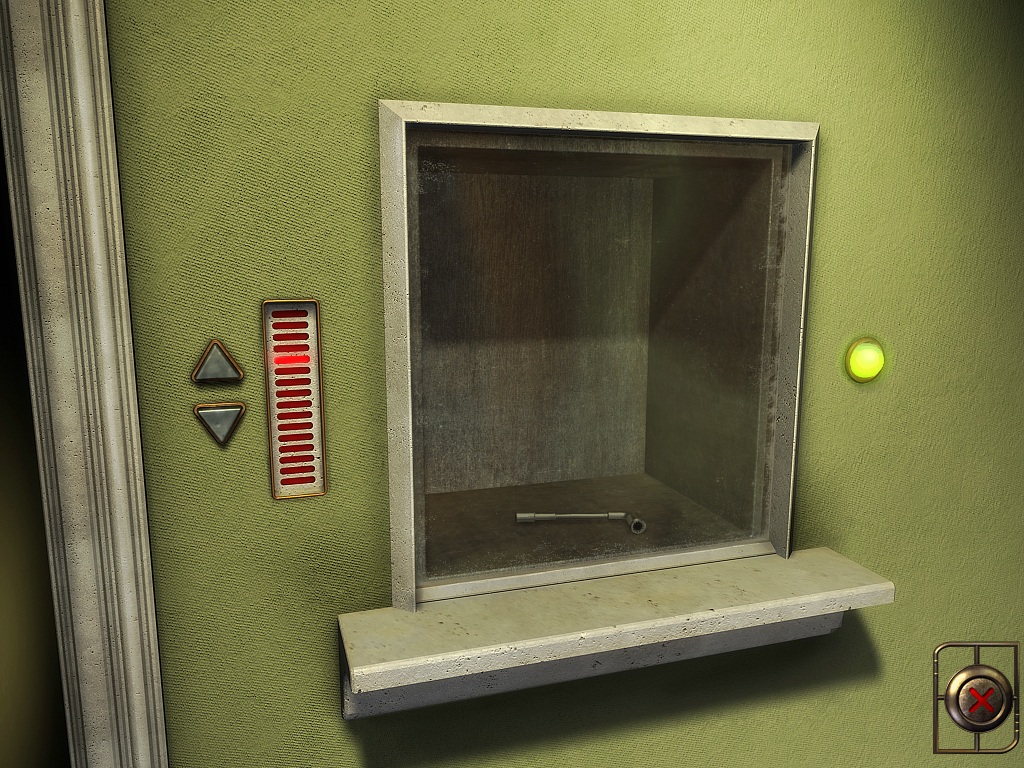 |
There are 16 bars. You start at the 5th from the bottom, and you need to land at the 5th from the top (so you need to go up 7). The up arrow moves up 5, and the down arrow moves down 7. Solution: You need to hit the "up" arrow a total of seven times, and the "down" arrow a total of four times. Here are some solutions:
|
Take the special pipe key, and exit the Kitchen the way you came in. You are in the West Corridor.
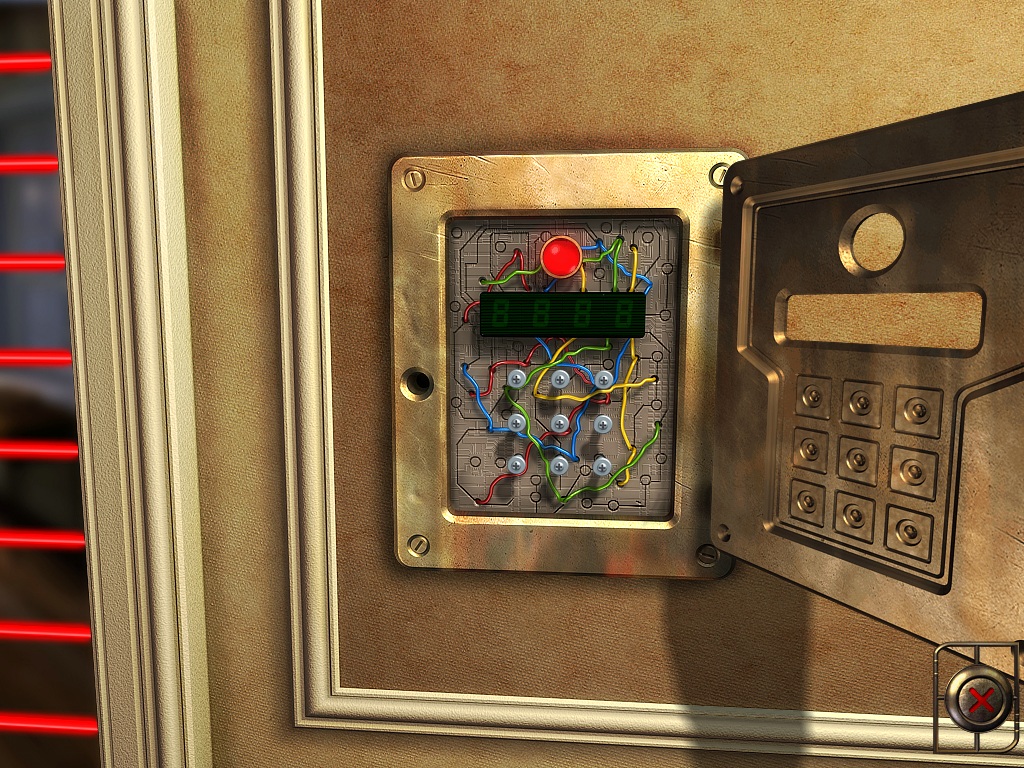
West Corridor
|
At the end of the corridor is a doorway blocked by red laser beams. Click on the panel to the right of it. Use the special pipe key on the bolt at the left of the panel to open it. See four colored wires. Hint: Look at the shape formed by one color of wire (any color)...see if you can find a pattern. Solution: Click here to display the solution. Enter the Yellow Room. |
 |
Yellow Room
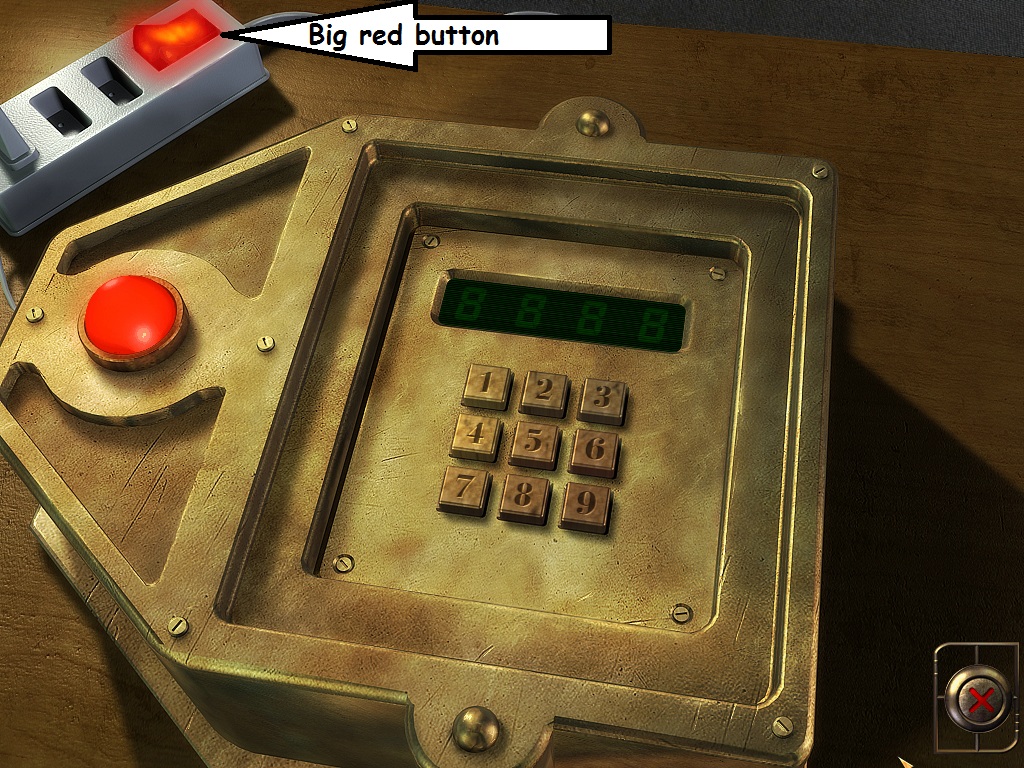 |
Turn left, go forward and pan down. Click for a closeup. Solution: Hit the big red button at the upper left of the screen. Take the magnetic pass and the Snooker rules. Head to the Games Room (exit the Yellow Room, turn left, then forward three times, turn left, go forward five times, turn left, go forward twice and you're in the Games Room.) |
Games Room
Racing Game
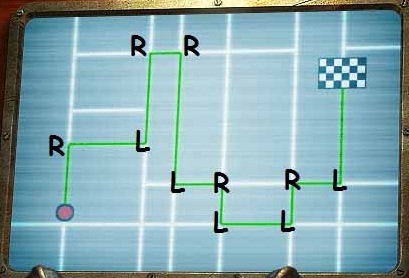 |
Go past the pool table to the arcade game at the other end of the room. Click for a closeup. Insert the GPS keycard you obtained in the Basement. Turn the key to start the game. Objective: Get the car to the finish line by following the green path. The car doesn't actually move, so you will have to visualize in your head. Solution: R L R R L R L L R L. Take the slip of paper. We'll use it later in the Museum, but for now, turn around, then head right to the keypad on the wall, to open the Snooker Safe. |
Snooker Safe
|
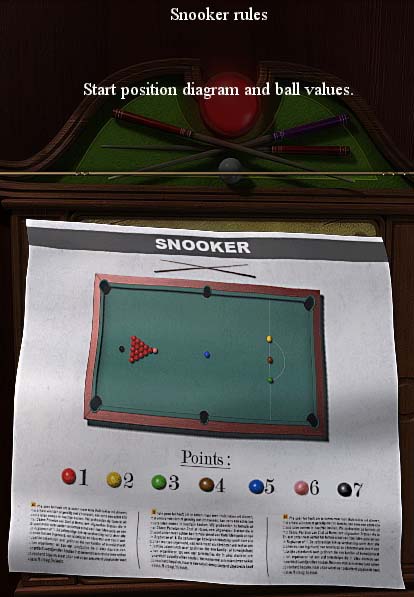
Insert the magnetic pass you obtained over at the Racing Game. Objective: Enter the code, which is based on the Snooker game in progress behind you. Take a look at the Snooker rules in your inventory, then examine the table. See that the green and black balls are missing. The yellow ball is sunk (although this is irrelevant for some reason), and two red balls are sunk. There is also a white ball on the table...but this is the cue ball and doesn't count. The key balls are Green = 3, Black = 7, and Red = 1. Solution: Any combination of 1 1 3 7. Take the fountain plug and the lever. Head downstairs to the Winter Garden to solve the fountain puzzle. |
 |
Games Room Door
This door will open when you complete the final panel in the Museum. Go through it to enter the Library.
Library
Enter the library through the Games Room, through the door you opened by solving the final panel in the Museum.
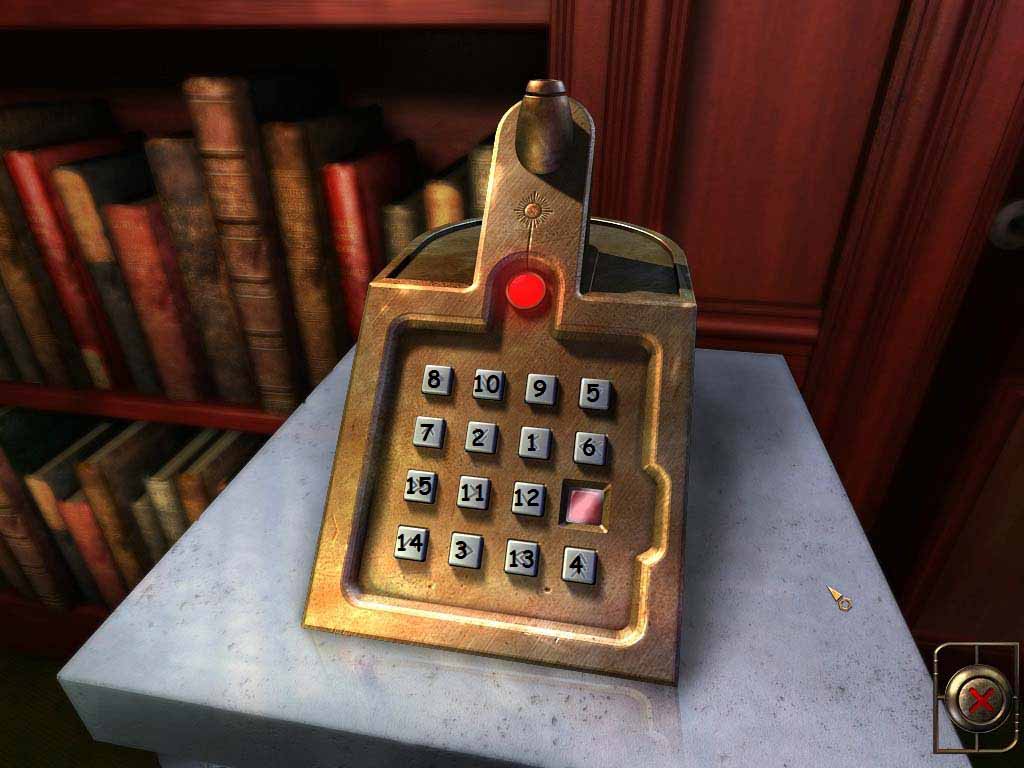
Keycard Reader Safe
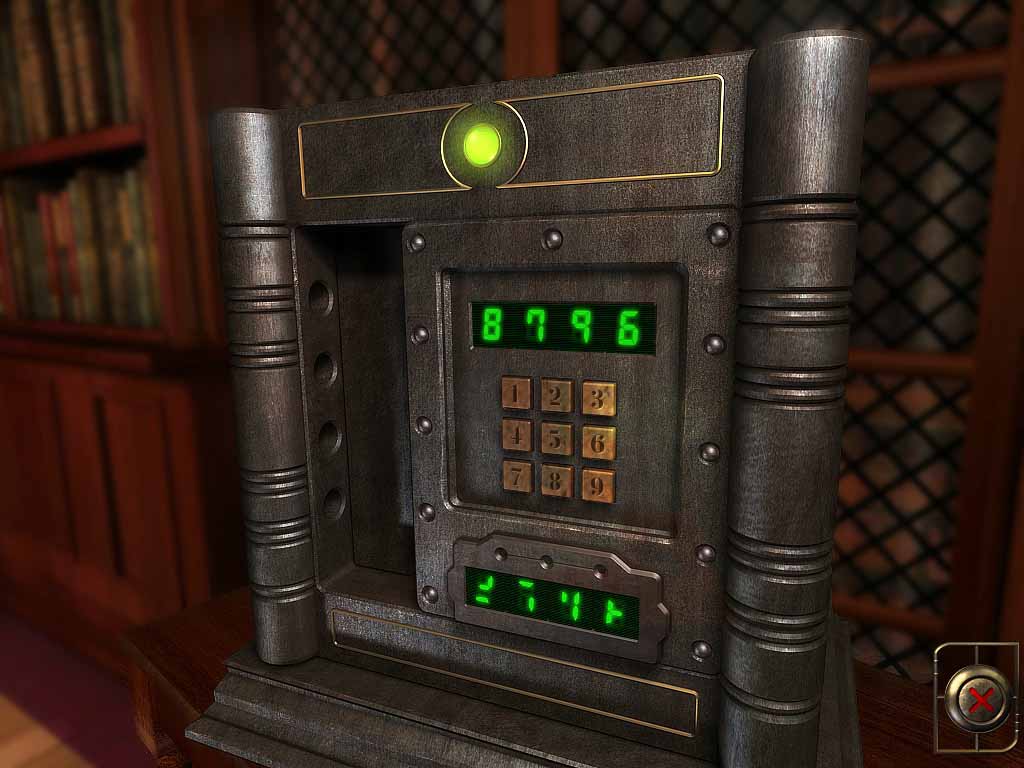 |
Place the "Screen and Keycard Reader" that you obtained in the Violet Bedroom on the lower portion of the safe. By pressing each number four times, you can see that only 6, 7, 8, and 9 move a bar on the left of the safe. So the solution is 6789 in some order. Solution: Enter 8 7 9 6. Take the triple key, then turn to the other safe in this room. |
Five-Digit-Code Safe
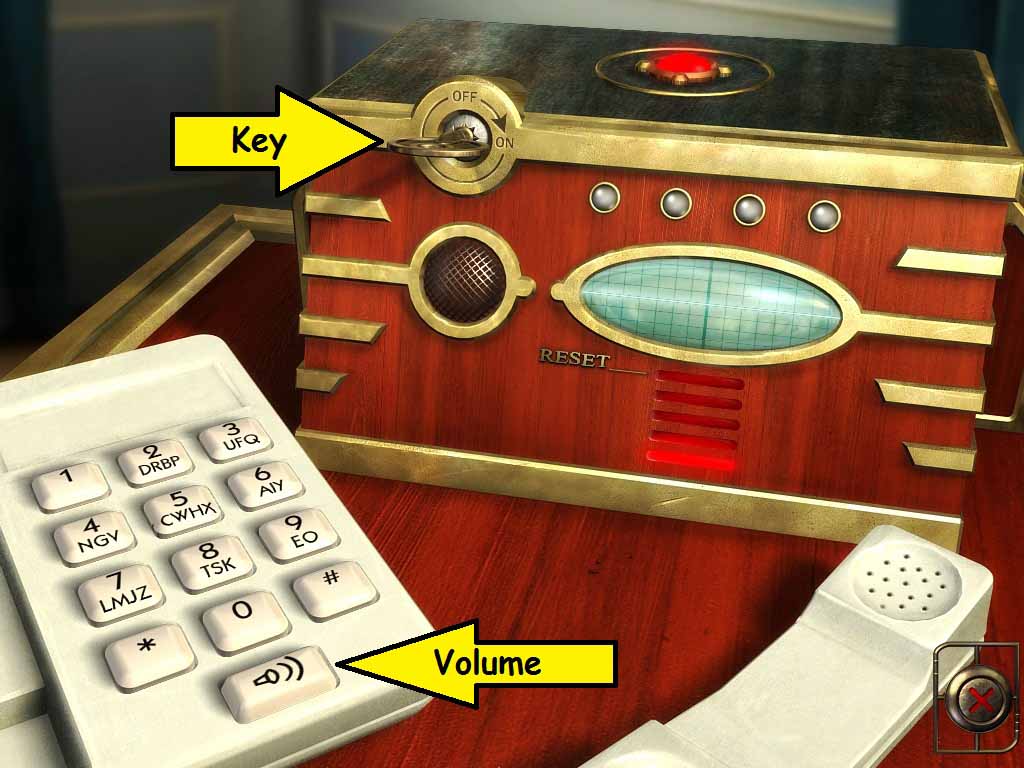
(a.k.a. Call Sarah Safe)
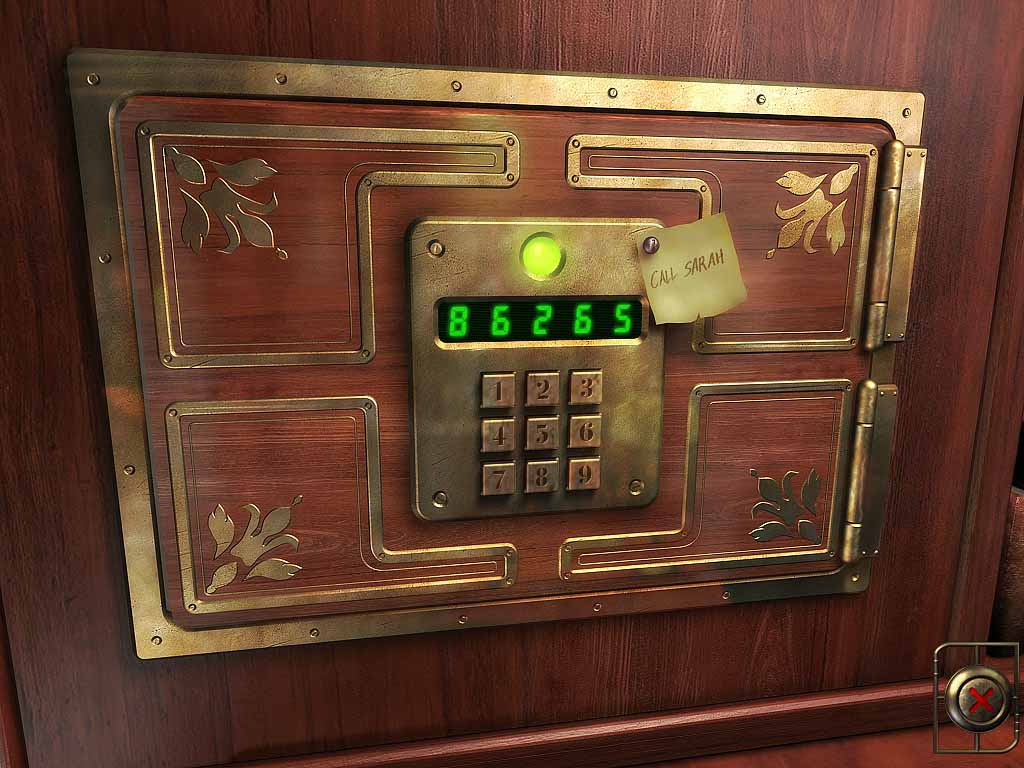 |
The sticky note on the safe says "Call Sarah." Right-click to bring up inventory, then left-click on the door at the bottom right of the screen. Check out the menu screen. Look at the letters on the telephone buttons in the upper right. SARAH = 86265. Solution: Enter 8 6 2 6 5 on the keypad. |
Take the steering wheel, then head to the Blue Bedroom, which is opposite the Yellow Bedroom (at the other end of the Second Floor). (Note: There is a phone in the Blue Bedroom with the same odd keypad.)
East Corridor
Door at End of Corridor
Open the door with the Double Key you grabbed from the fountain in the Winter Garden. Enter the Violet Bedroom.
Steering Wheel Door
|
Place the steering wheel obtained in the Library on the panel. Objective: Move all the bars to the right by turning the wheels. Each bar needs to move to the right a net total of twice. From the top, wheel 1 controls bars 1 & 4, then 5 & 6. Wheel 2 controls bars 4 & 5, then 1 & 5. Wheel 3 controls bars 2 & 3, then 1 & 4; wheel 4 controls bars 2 & 6, then 1 & 2; and wheel 5 controls bars 3 & 5, then 1 & 4. Solution: Click on wheels 5 5 4 3 1 1. The door opens. Go up the ladder to the loft. |
 |
Violet Bedroom
Music Box Safe
 |
Use the small gold key you obtained in the Workshop on the radio-shaped music box. Take the small iron key and the keycard reader. Now go to the Library, through the door in the Games Room that you opened by completing the third panel in the Museum. |
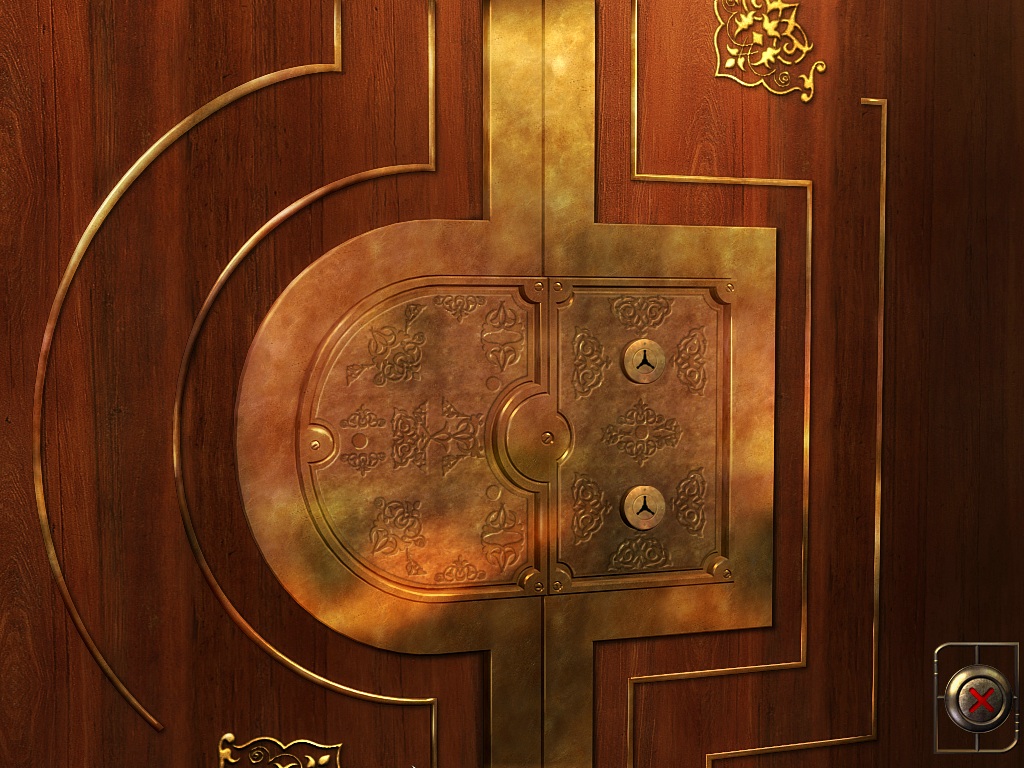
Locked Door
|
You need two triple keys to open this door...and two triple keys to open the door behind it. They are located:
Open the doors, and go on in. Our boy is quite excited to have reached the final safe. Of course, we still need a 4-digit code to open it. (Save your game here, so you can run through several alternate endings.) |
 |
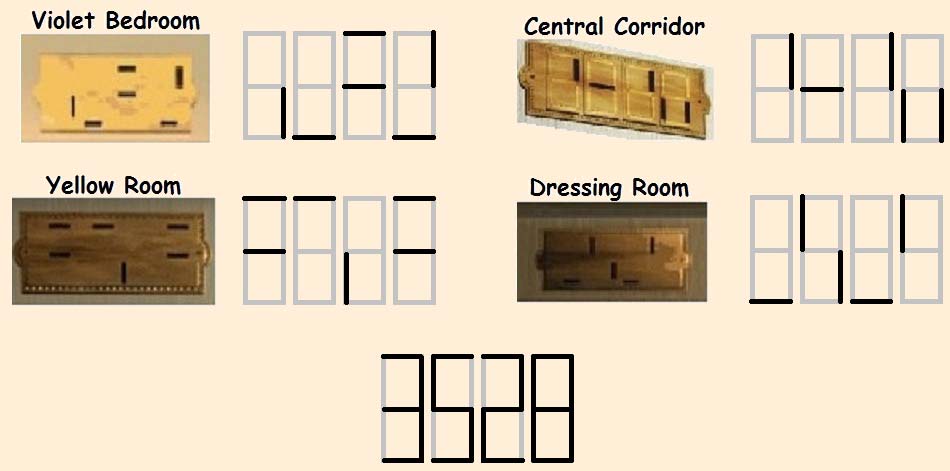
Hint: There are four doors in the mansion that have brass plates at the top. They are located in the Violet Bedroom, the Yellow Room, the Dressing Room, and the Central Corridor. Open the doors, then have a look at the plates. ...Try combining all four plates.
Solution: Click here to display the solution.
Once you enter the final code, you get to choose a beneficiary. The letters and journal pages scattered throughout the mansion may guide your choice...but you can choose any of them for fun.
Blue Bedroom
|
Use the small iron key you obtained in the Music Box safe in the Violet Bedroom, then turn the device on. Hit the volume button at the bottom of the phone, or the device won't work. Objective: Enter the correct 4-digit code. You have five chances to guess it before the puzzle resets with a new code. (You have to turn the key off, then on to reset the box if this happens - which I found very annoying.) The four lights at the top of the device indicate your progress – solid green means right number, right position; blinking green means right number, wrong position; and solid red means the number is not in the solution. Solution: Unfortunately this is a random puzzle. You can grab a friend and play Mastermind for a while to hone your skills...but eventually you're on your own. |
 |
As a hint, start with four different numbers (don't hit 1 four times, then 2 four times, etc). Try 1 2 3 4. A red light in the first position would mean that 1 isn't in the solution, a blinking light in the first position would mean that 1 is in the solution, but not in the first position, and a solid green light would mean that 1 is the first number of the solution.
Swap out "red light" numbers for untried numbers (i.e., 5, 6, 7, 8, 9, 0), while at the same time switching the order of "blinking green light" numbers.
Don't be afraid to bust out the pencil and paper. Eventually you will get it!
Take the chip card and letter from Margaret. Go downstairs to the Workshop to use them.
Dressing Room
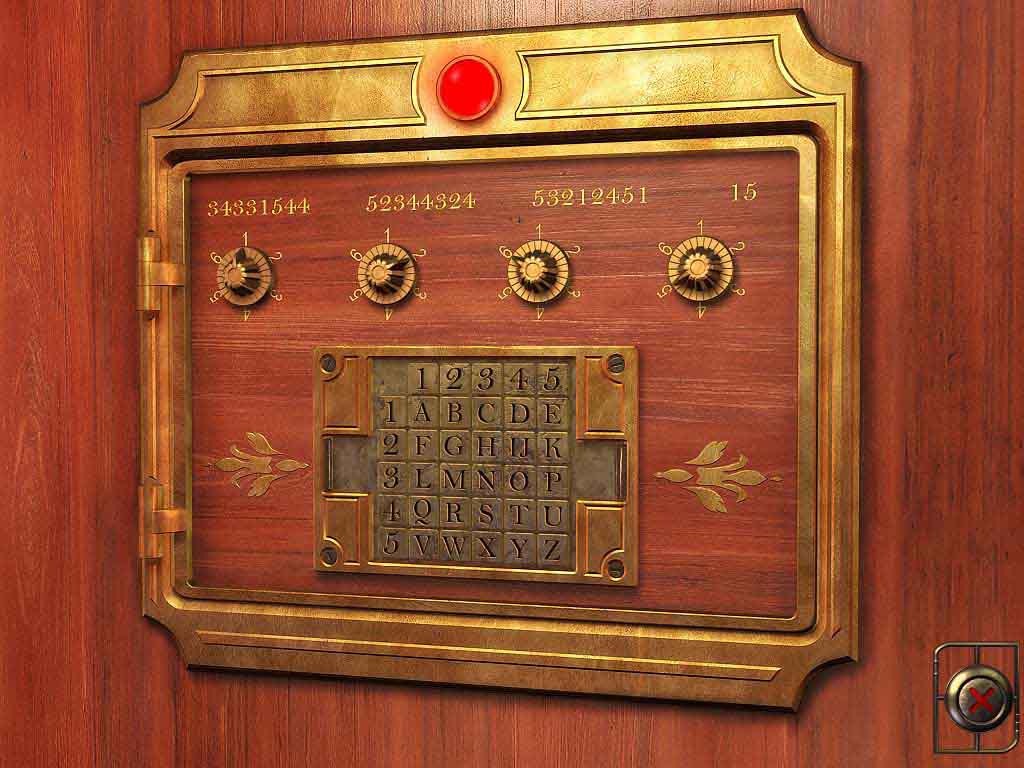
|
Zoom in on the wall panel. Place the Carved Stone Block obtained in the Loft on the lower portion of the panel. Our boy comments that it's a Polybius Square. The first number of each pair of numbers along the top of the safe refers to the left of the Carved Stone Block, and the second number refers to the top of the Carved Stone Block. The numbers translate to:
Solution: Enter 1 2 6 5 on the dials. Wait a couple of seconds for the safe to open. Take the triple key. Head back to the Violet Bedroom. |
 |
BASEMENT
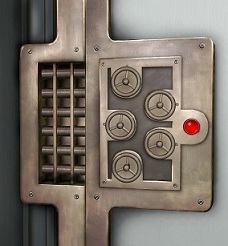
Light Control Panel at Entrance
|
Objective: Connect the power so it flows from the middle right side to the large lights (or fuses?) on the left. Solution: Turn all the little red knobs so they point upwards. (Or turn them so they all point downwards. Or, the top row points left and the right side points right...or vice versa.) Now that the lights are on you can explore the rest of the basement. |
 |
Store Room Water Pump
Place the piston you obtained from the cabinet in the Small Sitting Room in between the other two pistons, at the left of the large water tank.
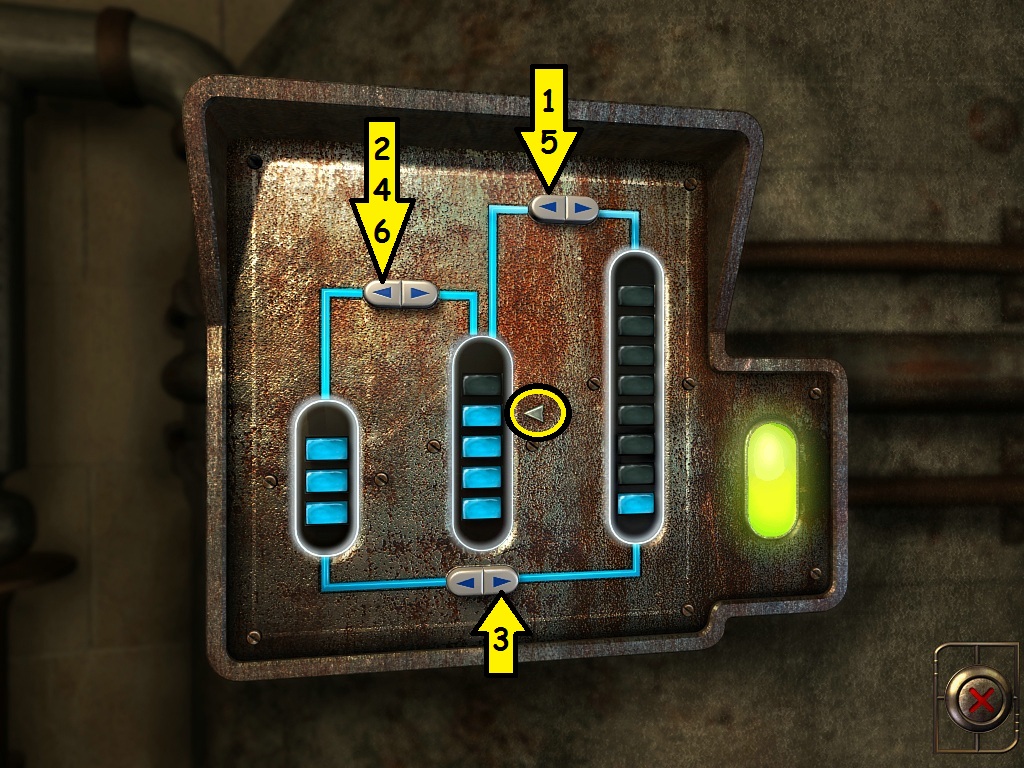 |
Objective: Raise the water in the middle section four bars, to the little arrow indicator. Solution: Press the buttons in the order indicated in the picture to transfer the water as follows:
See the water in the fountain upstairs start flowing. |
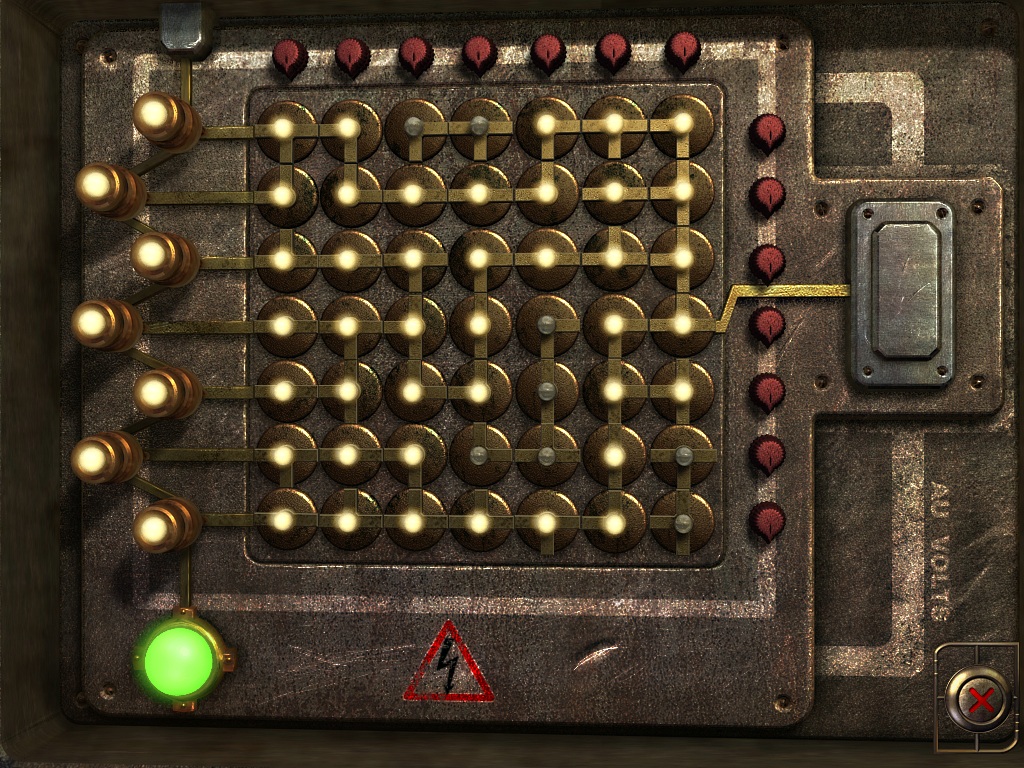
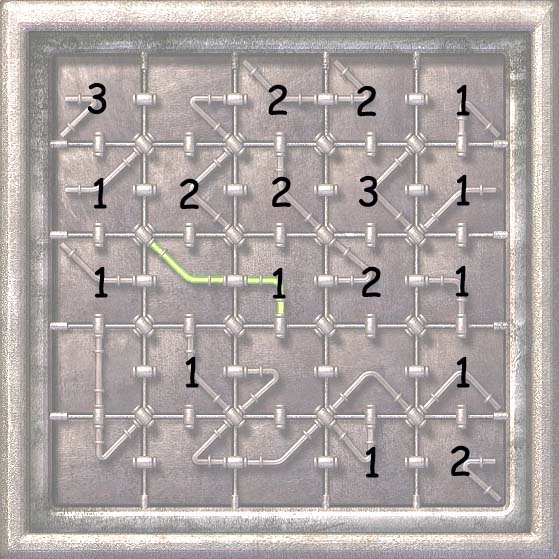
Wine Cellar Circuit Panel
|
Objective: Connect the dots. Make a path from the start light at upper left to the finish light at upper right. Click only on every other light in your path. Solution: Click on the lights in the order shown in the picture. Take the GPS keycard and the brass key. Head upstairs to the Bottom of the Main Staircase. |
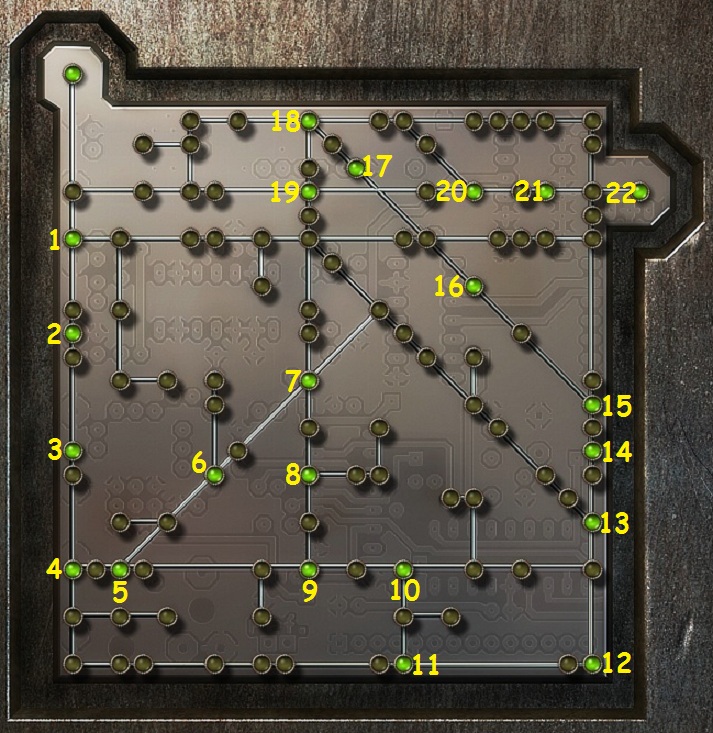 |
LOFT
Checkerboard Safe
|
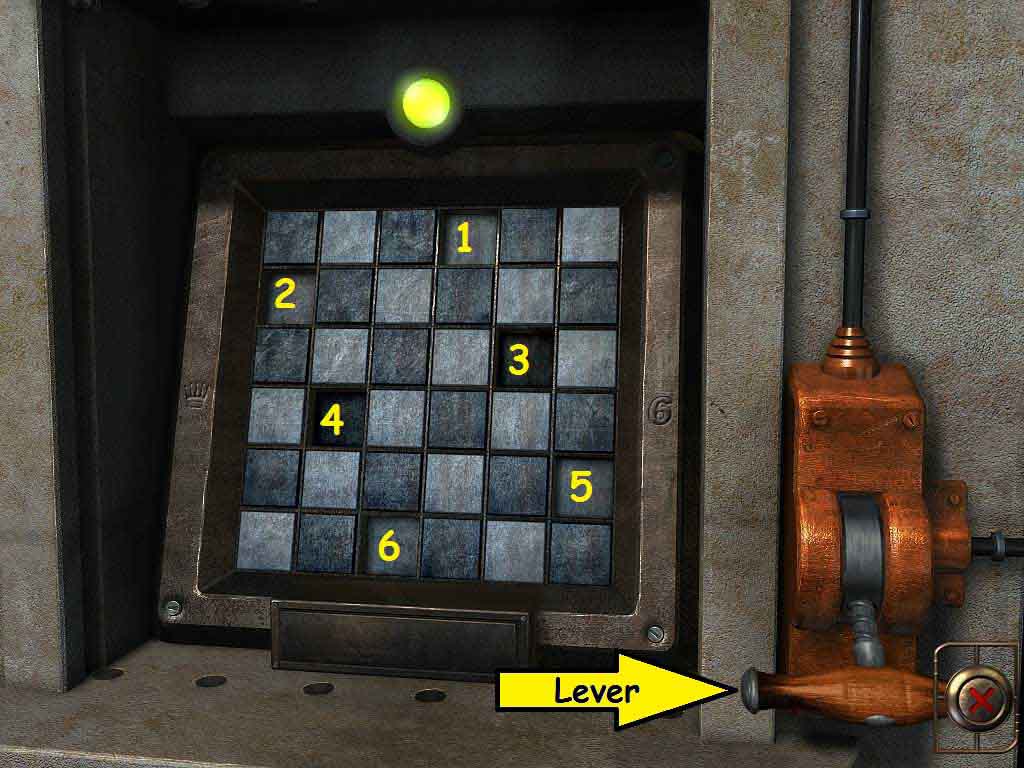
Go to the first safe, straight ahead. Use the lever you obtained by opening the Snooker Safe in the Games Room. Put it in the hole on the far right. A panel opens to a checkerboard safe. Objective: Press one square in each row, column, and diagonal. The fact that some squares are dark and some are light is irrelevant. Solution: pictured at right. Press the numbered squares in any order. Take the triple key, and head to the other safe in the Loft. |
 |
Neon Tube Safe
 |
Objective: Rotate the squares to make one continuous green neon chain. Solution: Pictured at left. Click each square the indicated number of times. Take the Carved Stone Block. Head to the Dressing Room by going to the West Corridor and opening the door on the left just before the Blue Bedroom. |
ITEMS
Keys
| Key | Where Found | Use | |
 |
Small Gold Key | Laser safe in Workshop | Music Box safe in Violet Bedroom |
 |
T-Shaped Key | Laser safe in Workshop | Cabinet in Small Sitting Room |
 |
Special Pipe Key | Kitchen Dumbwaiter/Elevator puzzle | Door in West Corridor to Yellow Room |
 |
Brass Key | Basement Wine Cellar - Circuit Panel | Door in Dining Room to Bottom of Main Staircase |
 |
Double Key | Fountain in Winter Garden | Door in East Corridor to Violet Bedroom |
 |
Small Iron Key | Music box safe in Violet Bedroom | Phone safe in Blue Bedroom |
 |
Triple Keys |
|
Door in Violet Bedroom to Secret Room |
Paper Items
| Item | Where Found | Use | |
 |
Paper (4298) | Small Corridor safe | Double doors in Hall |
 |
Paper (L = E) | Museum Corner Safe | Main Sitting Room safe |
 |
Photo | Safe in Main Sitting Room | Dining Room safe |
 |
Letter from Hubert Dufigue De Pouillot | Dining Room safe | Clue to Workshop Laser safe |
 |
Snooker Rules | Safe in Yellow Room | Games Room - Snooker safe |
 |
Paper (6821) | Games Room - Racing Game | Museum Panel |
 |
Letter from Margaret | Blue Bedroom safe | Workshop - Dials safe |
Cards
| Card | Where Found | Use | |
 |
Magnetic Card | Workshop - Broken keypad safe | Study - door to Service Stairs |
 |
GPS Keycard | Basement Wine Cellar - Circuit Panel | Racing Game in Games Room |
 |
Magnetic Pass | Yellow Room safe | Snooker Safe in Games Room |
 |
Chip Card | Safe in Blue Bedroom | Dials Safe in Workshop |
Miscellaneous
| Item | Where Found | Use | |
 |
Resistor | Small Corridor safe | Door in Office to Workshop |
| Transistor | Office - Column keypad safe | Door in Office to Workshop | |
 |
8-pin Circuit | Main Sitting Room safe | Door in Office to Workshop |
 |
4-pin Circuit | Column safe in Study | Door in Office to Workshop |
 |
Fountain Plug | Snooker safe in Games Room | Fountain in Winter Garden |
 |
Lever | Snooker safe in Games Room | Loft - Checkerboard safe |
 |
Piston | Cabinet in Small Sitting Room | Basement Store Room - Water Pump |
 |
Keycard Reader | Music Box safe in Violet Bedroom | Keycard Safe in Library |
 |
Steering Wheel | "Call Sarah" safe in Library | Door to Loft in East Corridor |
 |
Carved Stone Block | Neon Tube Safe in Loft | Dressing Room safe |
Original images and descriptions are the property of Kheops Studios/The Adventure Company. This page ©2010 margotbean.